YBKJ A20 JN
| YBKJ A20 JN | |
|---|---|
 | |
| Manufacturer | Unknown |
| Dimensions | 150mm x 93mm x 23mm |
| Release Date | August 2014 |
| Website | Unknown |
| Specifications | |
| SoC | A20 @ 1Ghz |
| DRAM | 1GiB DDR3 @ 384MHz |
| NAND | 4GB |
| Power | DC 5V @ 2A |
| Features | |
| Video | HDMI (Type A - full), 3.5mm AV connector |
| Audio | HDMI, SPDIF, 3.5mm AV connector |
| Network | WiFi 802.11 b/g/n (Realtek RTL8188EUS), 10/100Mbps Ethernet (Realtek RTL8201CP) |
| Storage | SD |
| USB | 2 USB2.0 Host, 1 USB2.0 OTG |
| Other | IRDA |
| Headers | UART |
This page needs to be properly filled according to the New Device Howto and the New Device Page guide.
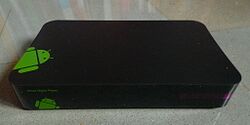
This A20 HTPC uses the same case as the TXCZ A20 and the Langcent h6s HTPCs, but it comes without an external Wifi antenna. What puts this device apart from other A20 devices is that there is no Power management IC (normally an AXP209).
Identification
The device is completely generic, there are no labels of any kind and it comes in a plain brown cardboard box, obviously without any manual. The only markings on the black plastic case are the green Android Robot logo and "Smart Media Player" written in small characters.
The PCB has the following silkscreened on it:
YBKJ_A20_JN_V2.2
In android, under Settings->About Tablet, you will find:
- Model Number: SoftwinerEvb
- Build Number: sugar_ref001-eng 4.2.2 JDQ39 20140403 test-keys
Sunxi support
Current status
Supported.
Images
HW-Pack
BSP
Manual build
- For building u-boot, use the YBKJ_A20_JN target (not found).
- The .fex file can be found in sunxi-boards as ybkj_a20_jn.fex
Everything else is the same as the manual build howto.
Tips, Tricks, Caveats
FEL mode
TODO: verify that USB OTG works.
Between the DC power connector and the SPDIF, there is a pinhole. Behind this is the button which triggers FEL mode. The OTG port is the USB host port on the back.
Picky SDCard
It seems this board is quite picky with the brand/type of SD card it will accept. The only accepted SDCard the owner of this hardware has now is a Samsung Class 10 16GB microSD card with an original Samsung microSD to SD adapter.
Adding a serial port
Device disassembly
There are no screws holding the two halves of the case together. The bottom half has a big clip in each corner, and small clips in the middle of all sides except the back. Carefully insert your plastic tool between the two halves, and gently push the clips to the inside until you release them. Start with one corner and progressively work your way around the case edge.
Be careful when opening the device, as the cable to the WiFi antenna (glued to the top cover) is quite short.
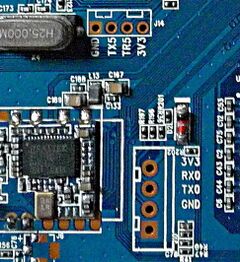
Locating the UART
While there are 3 UART connectors on the board, the one between the WiFi module and the RAM chip is UART0 which can be used for u-boot and kernel debugging. It is clearly labeled, just solder on some wires according to the UART howto.
Pictures
TODO: provide a new pair of pictures for the connectors, with light coming from a different angle, so that the engraved text under the connectors can be read.
Also known as
See also
- YBKJ A20: Another A20 HTPC, different form factor, components and PCB, but apparently from the same PCB designer ("YBKJ").
- TXCZ A20: Same form factor HTPC, different PCB and components.
- Langcent h6s: Same form factor HTPC, different PCB and components.


