Rikomagic mk802+
| Rikomagic mk802+ | |
|---|---|
 | |
| Manufacturer | Rikomagic |
| Dimensions | 88.5mm x 35mm x 13.4mm |
| Release Date | June 2012 |
| Website | German product page |
| Specifications | |
| SoC | A10 @ 1Ghz |
| DRAM | 1GiB DDR3 @ 480MHz |
| NAND | 4GB |
| Power | DC 5V @ 2A |
| Features | |
| Video | HDMI |
| Audio | HDMI, internal microphone. |
| Network | 802.11 b/g/n (Realtek RTL8188CTV) |
| Storage | µSD |
| USB | 1 USB2.0 Host, 1 USB2.0 OTG |
| Headers | UART |
This is the 1GB version of the popular MK802 and it comes with a redesigned motherboard.
Identification
Sometimes the case reads "MK802+", but this is also true for the Semitime G2. Apart from a date code, there is no text printed on the board.
In android, under Settings->About Device, you may find the following:
- Model Number: SoftwinnerEvb
- Build Number: apollo_mele-eng 4.0.4 IMM76D 20120910 test-keys
There is one issue remaining with identification though. The board in the documented example is blue, has a microphone and has a FEL button soldered on. The board commonly found on the internet is however green, but the layout seems to generally match, even though it sometimes lacks a FEL button. So there probably are a few different revisions available of this device.
Sunxi support
Current status
Supported.
Images
HW-Pack
BSP
Manual build
- For building u-boot, use the "mk802_1gb" target.
- The .fex file can be found in sunxi-boards as mk802-1gb.fex
Everything else is the same as the manual build howto.
Mainline U-Boot
Use the mk802_defconfig build target.
Mainline Kernel
Use the sun4i-a10-mk802.dtb device-tree file for the mainline kernel.
Tips, Tricks, Caveats
FEL mode
The MK802+ has a FEL button under the bottom hole of the left side of the top cover (next to the hdmi connector). Some versions of the MK802+ have saved a few cents on attaching a button though, but perhaps some of these are different boards altogether.
ADB
The device is factory rooted but so far ADB over USB hasn't been possible. To use ADB install a SSH Server like SSHDroid and start up the service. With the information provided by the Android App you can remotely log into the device(the login prompt displays the password. Type "adb shell" to enter ADB mode.
Adding a serial port (voids warranty)

Device disassembly
The three piece case is clicked together. Do not try to get the semi-transparent bit around the USB Host connector off, as it is clipped into the top and you could damage the clip. Just gently push your plastic tool between the bottom and the top, and push the top part of the shell outwards. You will soon hear the clips release.
Locating the UART
The TX and RX pins for UART 0 are to the right of the SoC. A good place to solder the GND connection is on the ground plane that runs along the side of the board. More information is available at our UART howto.
Pictures
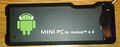
Mk802+ photo top of casing
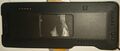
Mk802+ photo bottom of casing

Mk802+ photo side of casing showing SDcard

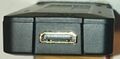
Mk802+ photo side of casing showing OTG
Mk802+ photo side of casing showing HDMI female socket
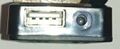
Mk802+ photo side of casing showing power connector and USB
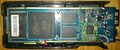
Mk802+ photo showing the CPU, DRAM, Flash, Wireless chip and power circuitry.
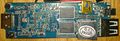
Mk802+ photo showing the DRAM and external connectors.

Mk802+ photo top of packaging
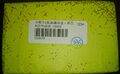
Mk802+ photo bottom of packaging
Mk802+ photo side of packing showing variant
MK802+ with different printing on the case


Also known as
This is often sold as the plain MK802, but it has 1GiB of DDR3 RAM, and has a different motherboard.
See also
- Rikomagic MK802: The 512MiB original.
- Semitime G2: A 1GB A10s based device with the same case.
- Rikomagic MK802II: A completely redesigned A10 based HDMI stick.