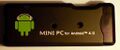
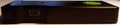
Rikomagic mk802
| Rikomagic mk802 | |
|---|---|
 | |
| Manufacturer | Rikomagic |
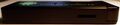
| Dimensions | 88.5mm x 35mm x 13.4mm |
| Release Date | May 2012 |
| Website | German product page |
| Specifications | |
| SoC | A10 @ 1Ghz |
| DRAM | 512MiB DDR3 @ 480MHz |
| NAND | 4GB |
| Power | DC 5V @ 2A |
| Features | |
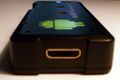
| Video | HDMI |
| Audio | HDMI |
| Network | 802.11 b/g/n (Realtek RTL8188CTV) |
| Storage | µSD |
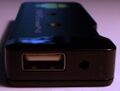
| USB | 1 USB2.0 Host, 1 USB2.0 OTG |
| Headers | UART |
This is the most popular HDMI stick out there. While the original idea came from the FXI Cotton Candy, the MK802 really opened up the world of HDMI sticks.
Many devices are currently named MK802 as a result. Some use the same case, but have different innards (MK802+ and Semitime G2). The MK802II is a complete redesign, but uses an A10 as well. The MK802III and MK802IV are not allwinner based, and use a rockchip SoC instead.
Rumour has it that many clones were made, so who knows, if we get enough devices documented in our wiki, we might see some severe motherboard differences.
Identification
When disassembled, the back of the board (connector side) will read 94V-0 and E232205.
In android, under Settings->About Tablet, you will find:
- Model Number: AK-MINI-PC-001
- Build Number: crane_risctek-eng 4.0.3 IML74K 20120608 test-keys
Or:
- Model Number: SoftwinnerEvb
- Build Number: apollo_tvdevb-eng 4.0.4 IMM76D 20120710 test-keys
Sunxi support
Current status
Supported.
Images
Success with Debian arm installer by selecting pcduino in the installer menu. Possibly no wireless, used a usb ethernet for LAN and iso image on usb stick for Debian installer data. Process of making an installer SD card is described here: Debian Installer SD Card Instructions
used:
firmware.pcDuino.img.gz
and
?partition.img.gz
from here: Debian FTP Site
plus on a usb stick: debian-stretch-DI-alpha8-armhf-netinst.iso from Debian Installer (I hope these links stand the test of time).
Connect HDMI and usb keyboard - the installer may show on the monitor, or maybe on serial. Serial is essential if you want to install a non-gui debian.
Please report here if anyone tries to modify this to use the correct mk802 device tree. (note: I did try this now, and it failed to run the kernel. This could mean I don't have a true Rikomagic MK802, or it could mean that the default sun4i-a10-mk802.dtb in Debian is wrong. My 'mk802' is marked 'DDR3/1GB' on the back.... If you try, then leave a copy of the pcduino dtb next to the new dtb, then you can swap in uboot by 'setenv fdtfile').
note Mainline has been enhanced with Debian kernel build notes.
HW-Pack
BSP
Manual build
- For building u-boot, use the "mk802" target.
- The .fex file can be found in sunxi-boards as mk802.fex
Everything else is the same as the manual build howto.
Mainline kernel
Use the sun4i-a10-mk802.dts device-tree file for the mainline kernel.
Tips, Tricks, Caveats
FEL mode
The FEL button can be found by placing a pin into the hole in the bottom left corner on the top cover of the device. Pressing when powering up triggers FEL mode.
ADB
The device is factory rooted but so far ADB over USB hasn't been possible. To use ADB install a SSH Server like SSHDroid and start up the service. With the information provided by the Android App you can remotely log into the device(the login prompt displays the password. Type "adb shell" to enter ADB mode.
Adding a serial port (voids warranty)

Device disassembly
The three piece case is clicked together. Do not try to get the semi-transparent bit around the USB Host connector off, as it is clipped into the top and you could damage the clip. Just gently push your plastic tool between the bottom and the top, and push the top part of the shell outwards. You will soon hear the clips release.
To remove the mainboard, be really careful, as all the connectors are wedged in. First release the two accessible clips of the transparent bit around the host connector, you will need this extra mm of space (don't push it further, or you might break the third clip). Then, try to wiggle the female hdmi connector free from its hole in the case. Then, start working the micro-usb-connector, use 2 plastic tools to push the whole of the motherboard away from the case, from each side of the usb connector. After some careful wriggling you should be able to get the motherboard out.
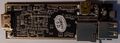
Locating the UART
The TX and RX pins for UART 0 are next to the SoC. A good place to solder the GND connection is on the ground plane that runs along the side of the board. More information is available at our UART howto.
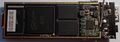
Pictures
Below are some pictures of a very heavily maimed mk802. It had led a hard life at its previous owner, who had crudely opened the device (broken clips and lifted USB OTG ground pads) and who badly drilled holes into the case for ventilation. Then there were the tar deposits (heavy smoker) on the usb host and micro-sd connector shields, and the fact that the usb host connector was badly worn...
Only the two holes on the left hand side are original.

What a messy job this was.


If anyone has a cleaner device, feel free to upload better pictures here.
There should also be a green PCB version available. This has a much later timestamp (at least 1234), but still mentions 94V-0 and E233305. The layout looks the same, but the FEL button seems to be missing.
Also known as
See also
- Rikomagic MK802+: A 1GiB version of the original MK802 with a redesigned motherboard, but the same case.
- Semitime G2: A 1GiB A10s based device with the same case.
- Rikomagic MK802II: A completely redesigned A10 based HDMI stick.