Sinovoip Banana Pi M2+
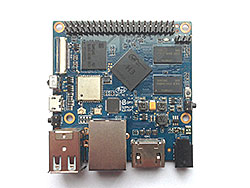
Banana Pi M2+ is H3 based development board produced by Sinovoip, mostly compatible with the H3 Orange Pis.
Despite its name, the M2+ is incompatible to previous Banana Pi boards (Banana Pi/M1/M1+/Pro/M2), due to a different SoC - requiring different boot loaders and drivers. It's another attempt to cash in on the Banana Pi's popularity with a SBC only sharing brand, name, form factor and GPIO header.
| Sinovoip Banana Pi M2+ | |
|---|---|
 | |
| Manufacturer | Sinovoip |
| Dimensions | 65mm x 65mm |
| Release Date | April 2016 |
| Website | M2+ product page |
| Specifications | |
| SoC | H3 |
| DRAM | 1GiB DDR3-1600 (K4B4G1646D-BCK0) |
| NAND | 8GB eMMC 4.5 (Samsung KLM8G1WEMB-B031) |
| Power | DC 5V @ 2A (4.0mm/1.7mm barrel plug - centre positive) |
| Features | |
| Video | HDMI (HDCP, CEC) |
| Audio | HDMI |
| Network | BT4.0/WiFi 802.11 b/g/n (Ampak AP6212), 10/100/1000Mbps Ethernet (Realtek RTL8211E) |
| Storage | µSD |
| USB | 2 USB 2.0 Host, 1 USB 2.0 OTG |
| Other | IR |
| Headers | 3 pin UART, CSI, 40 pin GPIO |
Identification
The PCB has the following silkscreened on it:
BPi M2 Plus V1.1
or
BPi M2 Plus V1.2
Sunxi support
Current status
The H3 SoC support has matured since its introduction in kernel 4.2. Most of the board functionality for boards such as BPi M2+ are available with current mainline kernels. Some features (hw accelerated crypto, hw spinlocks, and thermal) are still being worked on. For a more comprehensive list of supported features, see the status matrix for mainline kernels. In addition, legacy 3.4 kernels are available in various work-in-progress git branches.
See the Manual build section for more details.
BPi M2+ is more or less a clone of Orange Pi PC/Plus it benefits automagically from all progress being made for these boards.
Manual build
You can build things for yourself by following our Manual build howto and by choosing from the configurations available below.
U-Boot
Mainline U-Boot
Use the orangepi_plus_defconfig (as a workaround until dedicated defconfig is available). Some alternative configs available from
* Sinovoip_BPI_M2_plus_defconfig (tested with 2016.03 and sun8i-h3-bananapi-m2plus.dts from below).
* [1] build target. The U-Boot repository and toolchain is described in the Mainline U-Boot howto.
The H3 boards can boot from SD cards, eMMC, NAND or SPI NOR flash (if available), and via FEL using the OTG USB port. In U-Boot, loading the kernel is also supported from USB or ethernet (netboot). HDMI support in U-Boot is still WIP.
Linux Kernel
Sunxi/Legacy Kernel
The 3.4 kernel from the official Allwinner's git repository does not support H3 yet. But it is possible to use one of the kernel forks, based on the lichee H3 SDK tarball:
- Siarhei Siamashka's branch '20151207-embedded-lima-memtester-h3'
- Yann Dirson's fork added a few more fixes and adopted most of
- Boris Lovosevic' great initial work on Allwinner's H3 kernel
Configure this kernel using sun8i_h3_defconfig, the rest is explained in the kernel compilation guide.
Use the .fex file for generating script.bin. Use the bananapim2plus.fex file.
When booting the legacy 3.4 kernel with the mainline U-Boot, add the following line to boot.cmd:
  setenv machid 1029
  setenv bootm_boot_mode sec
Some other legacy kernel repositories:
- 3.4-lichee-based kernel, based on work by ssvb and loboris
- Yocto support here glues together all the required parts to get this kernel to work with mainline u-boot, as well as accelerated X11/GLES support
- A newer H3 BSP variant appeared with tons of fixes which has been made available by FriendlyARM.
- A cleaned up fork has been adopted by Armbian project. On top of that Armbian maintains a bunch of 3.4.x patches for H3 devices.
Mainline kernel
The mainline kernel has good support for the H3 SoC. Please refer to the status matrix for a more detailed list of the development process, links to patches and links to kernel fork repositories. Minor drivers that are currently work-in-progress may require a) third party patches (see also arm-linux mailing list) or b) a pre-patched distro (e.g. Armbian).
Repositories with H3 patches:
- Ondřej Jirman's branch for H3 based orange Pi (kernel 4.19) (work-in-progress DVFS)
- Thermal regulation (if CPU heats above certain temperature, it will try to cool itself down by reducing CPU frequency)
- HDMI audio support (from Jernej Skrabec)
- Configure on-board micro-switches to perform system power off function
- Wireguard (https://www.wireguard.com/)
- Philipp Rossak's THS patches (in the sunxi-ths- branches)
- Corentin Labbe's HW Crypto and spinlock patches (in respective branches)
Use the sun8i-h3-bananapi-m2-plus.dtb. For the v1.2 board, there is also sun8i-h3-bananapi-m2-plus-v1.2.dtb. (old: or start on this working mixture of Orange Pi stuff: sun8i-h3-bananapi-m2plus.dts (everything working except of WiFi/BT due to lack of interest) device-tree binary.
Expansion port
Banana Pi M2+ features a 40 pin GPIO header that is advertised as being 'Raspberry Pi compatible'. That's not the case, the pinout varies for unknown reasons. Some details can be found in this post in Armbian forum and also somewhere hidden in manufacturer's forum (with an example how to patch WiringOP/WiringPi -- to be confirmed whether the pin mappings are correct in this example). It should be noted that the manufacturer's hardware description (fex file) still is wrong regarding GPIO pins.
At least one mistake has been discovered/documented: Physical pin 37 on the 40 pin header is not pin PA16 but PA17 instead. This is not a GPIO but OWA/SPDIF instead. Details can be found at the end of the aforementioned thread in Armbian forum.
Tips, Tricks, Caveats
FEL mode
There is a dedicated FEL button called UBOOT next to the reset button.
LEDs
According to Sinovoip's documentation the board has two LEDs but at least on the developer samples there is only one:
- A red LED, connected to the PL10 pin.
USB
The OTG port is exposed to the Micro USB jack that's also supposed to function as DC-IN source. USB host ports 1 and 2 are available as dual type A receptacle and the data lines of the 3rd USB host port are exposed without any ESD protection next to the 40 pin GPIO header for soldering experiments. For details see the approriate thread in banana-pi.org forum.
DRAM clock speed limit
DRAM is clocked at 672 MHz by the hardware vendor. The settings seem to be copy&paste from Xunlong's Orange Pis and reliability still needs to be verified. One of the ways of doing reliability tests may be https://github.com/ssvb/lima-memtester/releases/tag/20151207-orange-pi-pc-fel-test (developed for Orange Pi PC). An adoption of this using fex files suited for Banana Pi M2+ is available here (md5sum: ca8b910a5f60bbd11781423e8ade59fd fel-boot-lima-memtester-on-orange-pi-h3-v3.tar.bz2). Use the fel-boot-lima-memtester-on-banana-pi-m2-plus script inside.
You have to eject an SD card and in case your board's eMMC contains a valid boot loader you will have to press the u-boot button when you power on the board to enter FEL mode. Please be aware that the board already will boot when you connect the Linux host where fel-boot-lima-memtester-on-banana-pi-m2-plus is running on with M2+ since the powering scheme allows using the Micro USB port for DC-IN too (lima-memtester will need 3.5W so in case you want to power the board through USB from the host ensure that you chose an USB3 port since they provide 900mA where USB2 ports might only provide 500mA which is not sufficient and you have to provide stable 5V through the barrel connector)
Since there is only one red led available on this board that uses the same pin mapping of the green led on Orange Pi boards you will only see a blinking red led when the test runs and get no notification through a second led starting to light solid after the necessary amount of time so it's up to you to ensure that the test runs at least one hour and shows a spinning cube on a connected display for a gray background (if in doubt please read carefully through the useage instructions section and remember that led use is different on BPi M2+)
| WARNING: For yet unknown reasons testing DRAM reliability through FEL mode seems to be less reliable. For an alternative approach using an Armbian test OS image please see the relevant thread in Armbian forum. |
| Hardware | Diagnostic software | lima-memtester passes (at least running 1 hour) | lima-memtester fails | Notes |
|---|---|---|---|---|
| User:Tkaiser's Banana Pi M2+ | fel-boot-lima-memtester-on-orange-pi-h3-v3.tar.bz2 | 600 MHz | 624 MHz | cheap heatsink. 624 MHz fails after running for approx. 10 minutes |
| User:Tkaiser's same Banana Pi M2+ | Armbian 5.14 test image | 720 MHz | 744 MHz | cheap heatsink. 744 MHz shows glowing red background after approx. 6 minutes |
| User:gaara's Banana Pi M2+ | Armbian 5.10 image | (unknown, FEL boot too complicated) | 672 MHz | glowing red background |
CPU clock speed limit on rev 1.1 boards
Sinovoip chose the same SY8113B voltage regulator used on OPi One/Lite and NanoPi M1 but refrained from making the generated VDD_CPUX adjustable (the aforementioned boards switch through GPIO driven resistors between 1.1V and 1.3V). While released schematic show 1.2V SY8113B on BPi M2+ provides 1.3V which would allow a maximum clockspeed of 1200 MHz. Due to yet unknown reasons all released OS images by SinoVoip are limited to 1008 MHz maximum clockspeed anyway. They also prefer to kill CPU cores when the SoC starts to overheat instead of implementing sane throttling so be prepared to end up with a single core H3 board running at 1008 MHz maximum. While this is not that much of a problem for their Linux images since you can adjust the wrong THS settings yourself Android users might be surprised how slow the M2+ will be. Official OS images adopted more appropriate THS settings allowing 1200 MHz and some throttling steps in May 2016 so be sure to use a most recent one or upgrade script.bin contents yourself.
CPU clock speed limit on rev 1.2 boards
Boards marked as v1.2 implement voltage regulation using PL01 GPIO pin. Now switching between 1.1V and 1.3V (not known yet in which state the board comes up).
Fixed voltage / overheating
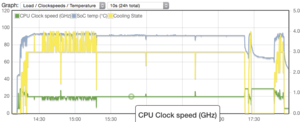
Unfortunately SinoVoip chose to feed H3 all the time with 1.3V on Rev 1.1 boards and 1.4V on Rev 1.0 boards. In this mode throttling is rather inefficient since temperatures do not decrease that much when only clockspeed will be reduced but not VDD_CPUX. Therefore expect severe performance problems unless you choose to apply a large heatsink and an additional fan. It's also easy to get killed CPU cores with BSP kernel since with real heavy workloads throttling isn't enough and the kernel driver devices to kill cores instead. Please note that with normal settings vendor OS images normally use you'll never get killed CPU cores back. Armbian implemented an ugly corekeeper hack to overcome this and the results look then like this: The 2 last rows are SinoVoip settings taken from their BPI-M2+ github repo and the new Armbian settings.
While running the multithreaded parts of the 'Phoronix test suite', almost all the time max cpufreq will be throttled down to 816 MHz. An Orange Pi PC with the same cheap passive heatsink would still run at 1008 MHz or even 1104 MHz since the lower VDD_CPUX voltage at these dvfs operating points results in less emitted heat. Please be aware that currently no throttling is implemented with mainline kernel therefore you risk serious damage when running even lighter workloads on the BPi M2+ with mainline kernel!
ESD & over-current protections
Based on the schematic Rev 1.2 (July 12, 2018) the board incorporates the following protections:
| Protections
x - no protection, ESD - Electrostatic Discharge, OC - Over-current |
Comments | |||
|---|---|---|---|---|
| 1 | DCIN/Micro USB (power) | x | OC | Fused (to unknown value) and bypassed. |
| 2 | Micro SD | x | x | |
| 3 | Camera | x | x | |
| 4 | Micro USB OTG | ESD | x | |
| 5 | Dual USB | ESD | OC (1.44A) | Limited by SY6280 (U8) if populated on the PCB |
| 6 | HDMI | ESD | x | |
| 7 | Ethernet | x | N/A | Over-current protection is not applicable |
| 8 | GPIO | x | x | |
| 9 | Debug UART | x | ? | |
Adding a serial port
Locating the UART
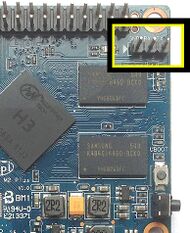
The UART pins are located between DRAM and GPIO header. They are marked as TX, RX and GND on the PCB. Just attach some leads according to our UART Howto.
Pictures
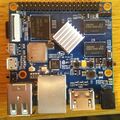
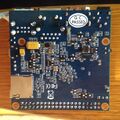
Rev v1.0
Rev v1.1
Variants
- In Sep 2016 a cost down variant called Banana Pi M2+ EDU has been announced with just 512MiB DRAM and saving eMMC and AP6212 (no WiFi/BT). Compared to cheap Fast Ethernet equipped H3 boards with the same or more amount of DRAM the only real advantage is Gigabit Ethernet on the M2+ EDU.
- In May 2017 a cost down variant called Banana Pi M2+ H2+ has been announced with a H2+ SoC instead of the original H3.
- In Feb 2017 Sinovoip posted a picture and in Aug 2017 the company listed the specs of a H5 variant of the board. The board does not seem to be available for order from the stores, though.
See also
- bananapi.com product page
- Detailed product specs containing contradictory statements as usual
- H3_Manual_build_howto
- File:BPI-M2-PLUS-V1 1 201605(Release).pdf
- File:Banana Pi BPI-M2+ V1 2 schematic diagram .pdf
