T702A
| T702A | |
|---|---|
 | |
| Manufacturer | Unknown. |
| Dimensions | 192mm x 122mm x 12mm |
| Release Date | March 2012 |
| Website | Unknown. |
| Specifications | |
| SoC | A10 @ 1Ghz |
| DRAM | 512MiB DDR3 @ 360MHz |
| NAND | 4GB |
| Power | DC 5V @ 2A, ?mAh 3.7V Li-Ion battery |
| Features | |
| LCD | 800x480 (7" 16:9) |
| Touchscreen | 5-finger capacitive/resistive (Focaltech FT5206GE1) |
| Video | HDMI (Type C - mini) |
| Audio | 3.5mm headphone plug, 3.5mm microphone plug, HDMI, internal speaker |
| Network | WiFi 802.11 b/g/n (Realtek RTL8188CTV) |
| Storage | µSD |
| USB | 1 USB2.0 OTG |
| Camera | 0.3MP (640x480) front |
| Other | Accelerometer (manufacturer device FIXME) |
| Headers | UART |
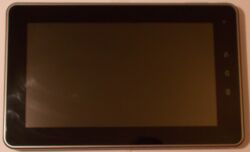
This Tablet is an A10 MID style device with capacitive buttons on the front, metal back cover, the typical 4 screws and the slot for the internal speaker on the connector side.
Identification
There is no printing on the case.
The PCB has the following silkscreened on it:
T702A_V02
2012/02/8
In android, under Settings->About Tablet, you will find:
- Model Number: T02A
- Build Number: crane_evb_v13-eng 4.0.3 IML74K 20120423 test-keys
Sunxi support
Current status
Supported.
Images
HW-Pack
BSP
Manual build
- For building u-boot, use the T702A target.
- The .fex file can be found in sunxi-boards as t702a.fex
Everything else is the same as the manual build howto.
Tips, Tricks, Caveats
FEL mode
The VOL+ button triggers FEL mode.
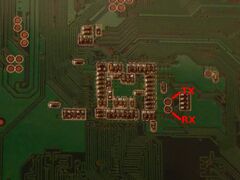
Adding a serial port (voids warranty)
Device disassembly
Remove the 4 screws. Now gently push your Plastic tool between the plastic outer edge and the metal back cover. Try to go around the whole board until you hear some clips pop, and do this until all clips have released. Be careful when opening the device, as the Wifi antenna is taped to the back cover.
Locating the UART
On the back of the board, right next to the (back of the) SoC, there are two pads. All you need to do is solder on some thin wires according to our UART howto.
Pictures
Also known as
See also
- GoClever Tab A73: Same formfactor, highly related motherboard.


