Pineriver H24
| Pineriver H24 | |
|---|---|
 | |
| Manufacturer | Pineriver |
| Dimensions | 60mm x 60mm x 13mm |
| Release Date | July 2012 |
| Website | H24 Product page |
| Specifications | |
| SoC | A10 @ 1Ghz |
| DRAM | 512MiB/1GiB DDR3 @ 360MHz |
| NAND | 4GB |
| Power | DC 5V @ 2A |
| Features | |
| Video | HDMI (Type A), Composite (3.5mm AV connector) |
| Audio | HDMI, 3.5mm AV connector |
| Network | WiFi 802.11 b/g/n (Manufacturer device) |
| Storage | µSD |
| USB | 1 USB2.0 Host, 1 USB2.0 OTG (full size) |
| Other | IRDA |
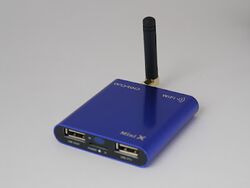
The Pineriver H24 was most commonly sold as the Mini-X, and earlier versions came with 512MB RAM while later ones came with 1GB. This version was prone to overheating, and the case was redesigned, and then sold as the Mini XPlus.
There have been many clones with different internals. Some with also an A10 inside (sometimes called MK805 or G1-TV), but some come with A10s (G1-TV-A10s or Semitime_g1_a10s) or A20. When these hit our community, they should be documented separately. There's even a Jesurun device called MT Box which has a Rockchip in it.
There is also a company called Minix. There is no relationship with pineriver and the devices are a different formfactor.
Identification
In android, under Settings->About Tablet, you will find:
- Model Number: H24
- Build Number: Add build number
Sunxi support
Current status
Supported.
Images
HW-Pack
BSP
Manual build
512MiB
- For building u-boot, use the "Mini-X" target.
- The .fex file can be found in sunxi-boards as mini-x.fex
Everything else is the same as the manual build howto.
1GiB
- For building u-boot, use the "Mini-X-1Gb" target.
- The .fex file can be found in sunxi-boards as mini-x-1gb.fex
Everything else is the same as the manual build howto.
Mainline kernel
Use the sun4i-a10-mini-xplus.dts device-tree file for the mainline kernel.
Tips, Tricks, Caveats
FEL mode
Pads for a button are present, but is not populated. You will have to trigger FEL mode through serial.
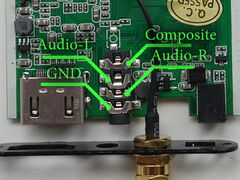
AV connector
You will need a special cable for the AV-connector.
Adding a serial port (voids warranty)
Device disassembly
Remove the two screws at the back, and the board should slide out easily.
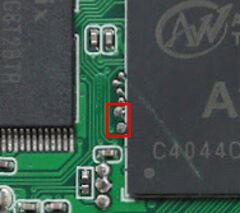
Locating the UART
There are two pads right next to the SoC, just swap your lines until you have identified RX and TX, as described in the UART howto.
Pictures
- Mini-X
Also known as
- Miniand Mini X
- Miniand Mini XPlus
- Jesurun Mini X


