Itead Iteaduino Plus
| Itead Iteaduino Plus | |
|---|---|
 | |
| Manufacturer | Itead |
| Dimensions | 109.2mm x 76.2mm x ? mm |
| Release Date | August 2013 |
| Website | Product page |
| Specifications | |
| SoC | A10/A20 @ 1Ghz |
| DRAM | 1GiB DDR3 @ 480MHz |
| Power | micro-USB |
| Features | |
| Video | HDMI (Type A - full) |
| Audio | HDMI, 3.5mm headphone plug, 3.5mm microphone plug |
| Network | 10/100 Ethernet (Realtek RTL8201CP) |
| Storage | µSD, SATA |
| USB | 2x USB2.0 Host, 1x USB2.0 OTG |
| Headers | 2 x 2x36pin (2.54mm) headers |
This page needs to be properly filled according to the New Device Howto and the New Device Page guide.
The Iteaduino Plus is an arduino compatible baseboard, which can take A10 and A20 "core"-boards. The result is called either an Iteaduino Plus A10 or an Iteaduino Plus A20.
The baseboard is OSHW (design files are here), while the core board has schematics available. Sadly, this board was designed with Cadence Allegro, which limits these files usefulness. Itead studios claimed to intend to switch to KiCAD for future designs, but this does not seem to have happened.
Sunxi support
Current status
Supported.
Images
HW-Pack
BSP
Manual build
For the A10 core board
- For building u-boot, use the "Iteaduino_Plus_A10" target.
- The .fex file can be found in sunxi-boards as iteaduino_plus_a10.fex
Everything else is the same as the manual build howto.
For the A20 core board
- For building u-boot, use the "Iteaduino_Plus_A20" target.
- The .fex file can be found in sunxi-boards as iteaduino_plus_a20.fex
Everything else is the same as the manual build howto.
Tips, Tricks, Caveats
There is no button to enter FEL mode on the iTeaduino Core or iTeaduino Plus baseboard. You must short the uBoot pin to ground using a jumper wire to enter FEL mode (pin 102 on the Core, pin 139 on the Plus baseboard).
Adding a serial port

There is a nice 2.54mm female pin header under the MicroSD slot, at the bottom side of the board. All you have to do is connect male jumper wires according to our UART howto.
Do not connect Vcc as that might damage your board.
Pictures
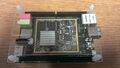
Top view of Iteaduino Plus with Core
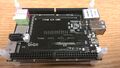
Top view of Iteaduino Plus without Core
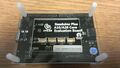
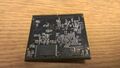
Bottom view of Iteaduino Plus
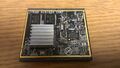
Top view of Iteaduino Core
Bottom view of Iteaduino Core


Also known as
This type of device knows no rebadgers.
See also
- Itead ibox: A HTPC based on the A20 core board and a different base board.
- Iteaduino Plus base board schematic
- Iteaduino A10 Core schematic