Itead ibox
| Itead ibox | |
|---|---|
 | |
| Manufacturer | Itead Studio |
| Dimensions | 95mm x 145mm x 27mm |
| Release Date | April 2014 |
| Website | Indiegogo Product Page |
| Specifications | |
| SoC | A20 @ 1Ghz |
| DRAM | 1GiB DDR3 @ 480MHz |
| NAND | 4GB |
| Power | DC 9V @ 2A |
| Features | |
| Video | HDMI |
| Audio | HDMI, TOSLINK S/PDIF |
| Network | 10/100Mbps Ethernet (Realtek RTL8201CP) |
| Storage | µSD |
| USB | 3 USB2.0 Host (GL850G hub), 1 USB2.0 OTG (port 4) |
| Headers | 32pin expansion header |
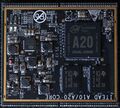
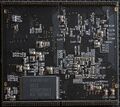
The Itead IBOX is a variation of the Iteaduino Plus A20. It uses the same mainboard module, but a different baseboard, and it comes with a nice case as well.
Identification
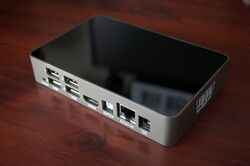
The IBOX is easily identifiable by the "IBOX" branding on the side, the aluminium case and high-gloss finish on the top of the case.
Sunxi support
Current status
The IBOX is very similar to the Cubieboard2 and boots most images build for the Cubieboard2 without issues. Images which Itead Studio themselves suggest actually have Cubieboard2 as the board type in u-boot. Thus, support is on-par with the Cubieboard2.
Images
Cubieboard2 images will work for this board. Itead lists some images here
Manual build
You can build things for yourself by following our Manual build howto and by choosing from the configurations available below.
Because this device is highly compatible with the Cubieboard2, you should also be able to get away with using the Cubieboard2 manual build instructions.
U-Boot
Mainline U-Boot
Use the Cubieboard2_defconfig build target unless Itead_Ibox_A20_defconfig is available.
Sunxi/Legacy U-Boot
Use the Cubieboard2 build target.
Linux Kernel
Sunxi/Legacy Kernel
Use the iteaduino_plus_a20.fex file.
Mainline Kernel
Use the sun7i-a20-itead-ibox.dtb device-tree file for the mainline kernel.file.
Tips, Tricks, Caveats
FEL mode
The Uboot button, left of the USB ports, triggers FEL mode. Hold the button in while plugging in power.
USB
3 of the 4 USB ports are connected to the outputs of the USB hub IC. However, USB 4 is connected directly to the port and supports USB OTG. Pins 1 and 2 of the expansion header export the same USB OTG port.
Power
Power is supplied by an MP2307 switching regulator. Theoretically, you should be able to power this board with 12V (which is more convenient than 9) without issues. The regulator provides a maximum of 3A @ 5V.
The device will also run if powered over the USB OTG port, which means you can run it from a 5V supply. Be careful as this is not intended operation and there is no protection for over-current, reverse polarity etc. That being said, I've measured a peak draw of about 700-800mA over 5V so a 1A supply should work well. Try this at your own risk - it is a hack.
LED/IRDA
The IBOX also has a dual-colour LED (red/green) and in infrared receiver connected to PB4 of the A20.
Expansion Header
The 32pin expansion header provides access to
- VGA
- Stereo analogue input/output
- SATA
- SPI
- I2C
- 4 UARTs (2 dedicated, 2 shared by SPI pins)
- Duplication of USB port 4
- Power
Serial port
Device disassembly
Board can be disassembled by removing the 4 screws on the bottom of the box. It is intended to be a development platform in a consumer package, so they have not made it difficult.
Locating the UART
The UART can be found on pins 9 (TX) and 10 (RX) with ground on pin 29 on the expansion header. Read the UART howto for more information.
Pictures
Also known as
The IBOX shares the core board with the Iteaduino Plus A20.
See also
- Iteaduino Plus A20: The same mainboard module supplied with a different baseboard.
- Source design file of IBOX baseboard
- Schematic of IBOX baseboard
- Schematic of ITEAD A20 CORE


