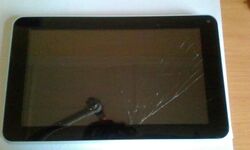
Inet D70 A23
| Inet D70 A23 | |
|---|---|
 | |
| Manufacturer | iNet Tek |
| Dimensions | 190mm x 115mm x 9.7mm |
| Release Date | Month year |
| Website | Device Product Page |
| Specifications | |
| SoC | A23 @ 60MHz - 1.536GHz |
| DRAM | 512MiB DDR3 @ 552MHz |
| NAND | 4GB |
| Power | DC 5V @ 2A, 2000mAh 3.7V Li-Ion battery |
| Features | |
| LCD | 800x480 (7" 16:9) |
| Touchscreen | Multi-Finger Capacitive (Silead GSL1680) |
| Audio | 3.5mm headphone plug, internal speaker, internal microphone |
| Network | WiFi 802.11 b/g/n (Realtek RTL8188ETV) |
| Storage | µSD |
| USB | 1 USB2.0 OTG |
| Camera | 0.3MP (640x480) front, 0.3MP (640x480) rear |
| Other | Accelerometer (Manufacturer device) |
| Headers | UART |
This page needs to be properly filled according to the New Device Howto and the New Device Page guide.
If a device is special, then feel free to provide a terse description of what makes this device so special. But terse, no novels, no marketing blurb.
Identification
Case:
Fondi
PCB:
INET-D70-REV03
Zeng-gc 2014-07-01
Android -> Settings -> About Tablet:
Model Number: T725B
Build Number: A23_D70_D708C_1410038.20141021
Sunxi support
Current status
Give a brief overview of the current status of support under sunxi here. If there is mainline support for either U-Boot or kernel, mention this too, but add the extra sections below.
Images
Add MANUFACTURER DEVICE specific sunxi ROM images here. E.g. a livesuit image or some other linux image which uses linux-sunxi code. Do not put non-sunxi images here, they should live under See also. If no sunxi based images are available, this section can be left blank.
HW-Pack
Add MANUFACTURER DEVICE HW-pack specifics here. This section can be left blank.
BSP
Add MANUFACTURER DEVICE BSP specifics here. This section can be left blank.
Manual build
- For building U-Boot, use the MANUFACTURER_DEVICE target.
- The .fex file can be found in sunxi-boards as MANUFACTURER_DEVICE.fex
Everything else is the same as the manual build howto.
Mainline U-Boot
If there is mainline U-Boot support, add this section.
For building mainline U-Boot, use the MANUFACTURER_DEVICE target.
Don't forget to add[[Category:Mainline_U-Boot]]at the bottom of the page.
Mainline kernel
If there is mainline kernel support, add this section.
Use the FAMILY-CHIP-DEVICE.dtb device-tree file for the mainline kernel.
Don't forget to add[[Category:Mainline_Kernel]]at the bottom of the page.
Tips, Tricks, Caveats
Add MANUFACTURER DEVICE specific tips, tricks, Caveats and nice to have changes here.
FEL mode
To enter FEL mode:
- Switch off the device.
- Hold down the Vol- and Power buttons.
- Release the Power button once u-boot reports: key pressed value=0xb.
- Press the Power three times, u-boot should report: you can unclench the key to update now.
- Release the Vol- button.
It is possible to query the device version at this stage, but reading results in failure.
Obtaining script.bin
- Cross-compile, and statically link, the script_extractor utility from sunxi-tools.
- Transfer the script_extractor binary to the device.
- Execute script_extractor, redirecting its output to a file named script.bin.
- Transfer script.bin to the host.
Adding a serial port (voids warranty)
Device disassembly
- Remove the two screws surrounding the button panel interface.
- Insert a suitable plastic tool into the seam of the casing next to one of the screw holes.
- Gently slide the tool towards and around the nearest corner.
- If the first clip has not been released at this point, twist the tool slowly to pry the casing halves apart.
- Place the tool on the opposite end of the released clip and proceed by sliding the tool towards the next clip.
- Continue carefully around the perimeter of the casing until all clips have been released.
Locating the UART
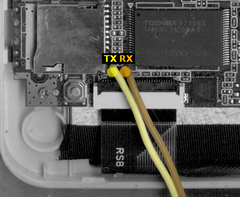
The TX and RX pads are located next to the Touchscreen ZIF connector, and the negative battery terminal provides the GND reference. Please review the UART howto for further information.
UART Cable Routing
As an alternative to carefully boring a hole in the rear casing, the Rear Camera may be removed for convenient cable access
Pictures
Also known as
See also
Manufacturer images
Optional. Add non-sunxi images in this section.


