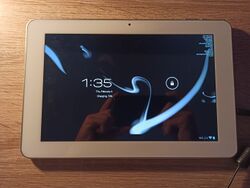
Yarvik tab462
| Yarvik tab462 | |
|---|---|
 | |
| Manufacturer | Yarvik |
| Dimensions | 268mm x 178mm x 11mm |
| Release Date | September 2012 |
| Website | N/A |
| Specifications | |
| SoC | A10 @ 1.6Ghz |
| DRAM | 1GiB DDR3 @ xxxMHz |
| NAND | 8GB |
| Power | DC 5V @ 5A, 6000mAh 3.7V Li-Ion battery |
| Features | |
| LCD | WidthxHeight (10" 1280:800) |
| Touchscreen | capacitive |
| Video | HDMI (Type C - mini) |
| Audio | 3.5mm headphone plug, HDMI, internal speaker, internal microphone |
| Network | WiFi 802.11 b/g/n Realtek rtl8150 |
| Storage | µSD |
| USB | 1 USB2.0 OTG |
| Camera | 0.3MP front, 2MP rear |
| Other | Accelerometer |
This page needs to be properly filled according to the New Device Howto and the New Device Page guide.
Identification
On the back of the device, the following is printed:
Yarvik
TAB462
The PCB has the following silkscreened on it:
A1001T v1.2
In android, under Settings->About Tablet, you will find:
- Model Number: TAB462
- Build Number: TAB462-eng 4.0.4 IMM76D 20120731 test-keys
Sunxi support
Current status
Images
Manual build
Not supported.
U-Boot
Sunxi/Legacy U-Boot
Not supported.
Mainline U-Boot
Not supported.
Linux Kernel
Sunxi/Legacy Kernel
Not supported.
Mainline kernel
Not supported.
Tips, Tricks, Caveats
FEL mode
The vol- button triggers FEL mode.
Adding a serial port (voids warranty)
This section explains how to attach a serial port to the device. Make sure it refers to our UART howto. For a development board, you can just mention how to find the header with the pins and include a picture, and you can remove the warranty voiding warning.
Device disassembly
If necessary, provide a short description of how to open the device. Perhaps explain how the pins can be most easily popped. If pins do need to be popped, mention the Plastic tool howto.
Locating the UART
Describe how to find the RX,TX,GND signals here, and mention the UART howto.
Pictures
Also known as
- Triline A1001T

