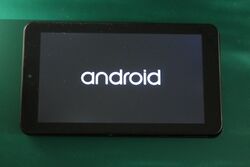
Unisurf USFT60U7BLK
| Unisurf USFT60U7BLK | |
|---|---|
 | |
| Manufacturer | Unisurf |
| Dimensions | 190mm x 110mm x 9.5mm |
| Release Date | Month year |
| Website | Device Product Page |
| Specifications | |
| SoC | A33 @ 1.3Ghz |
| DRAM | 1GiB DDR3 @ xxxMHz |
| NAND | 16GB |
| Power | DC 5V @ 1.5A, 2200mAh +3.7V Li-Polymer battery |
| Features | |
| LCD | 1024x600 (7" X:Y) |
| Touchscreen | 5-finger capacitive (Manufacturer device) |
| Video | HDMI (Type A/B/C - full/mini/micro), VGA |
| Audio | 3.5mm headphone plug SPDIF, internal stereo speakers, internal speaker, internal microphone |
| Network | WiFi 802.11 b/g/n (Manufacturer device), 10/100/1000Mbps Ethernet (Manufacturer device) |
| Storage | µSD |
| USB | X USB2.0 Host, X USB2.0 OTG |
| Camera | 0.3MP (????x????) front, no rear |
| Other | Accelerometer (Manufacturer device), GPS, IRDA, eMMC (Ramaxel REMPBT716716GSBB) |
| Headers | UART, JTAG, LCD, VGA, ... |
This page needs to be properly filled according to the New Device Howto and the New Device Page guide.
The Unisurf 7" tablet (Unisurf USFT60U7BLK) was a low cost tablet running Android 6.0 Marshmallow. This exact model may have been available only in Australia. However, the Printed Circuit Board (PCB) includes a "INET-D71B" designation (visible only after after disassembly (below)). It is yet to be confirmed if the information on this page is applicable for other INet D71 devices (for example, in the same way as the Inet_D70_A33 page).
Identification
On the back of the device, the following is printed:
unisurf
<device serial number sticker>
Model:USFT60U7BLK
The PCB has the following silkscreened on it (note that it may be partially hidden under a movable piece):
INET-D71B-REV02
Zeng-gc 2014-11-16
In Android, under Settings->About Tablet, you will find:
- Model Number: USFT60U7BLK
- Build Number: A33_D71C_U712HB2C_PG.1612215.20170208
Sunxi support
Current status
Give a brief overview of the current status of support under sunxi here.
User:Alldinner is working on populating this NDH. A means of entering a FEL mode that initialises to boot1 (as required to run Sunxi-tools) has not yet been found.
Images
Optional. Add MANUFACTURER DEVICE specific sunxi ROM images here. E.g. a livesuit image or some other linux image which uses linux-sunxi code. Do not put non-sunxi images here, they should live under See also. If no sunxi based images are available, this section can be removed.
HW-Pack
Optional. Add MANUFACTURER DEVICE sunxi HW-pack specifics here. When empty, this section can be removed.
hwpack info is to be determined.
BSP
Optional. Add MANUFACTURER DEVICE sunxi BSP specifics here. When empty, this section can be removed.
BSP info is to be determined.
Manual build
You can build things for yourself by following our Manual build howto and by choosing from the configurations available below.
U-Boot
Mainline U-Boot
Use the MANUFACTURER_DEVICE build target.
Linux Kernel
Mainline kernel
Use the FAMILY-CHIP-DEVICE.dtb device-tree binary.
Tips, Tricks, Caveats
Add MANUFACTURER DEVICE specific tips, tricks, Caveats and nice to have changes here.
FEL mode
FEL mode is accessed by using the VOL+ button as follows:
- Press and hold the VOL+ key.
- Press and hold the power key for about 2 seconds.
- Release the power key, and press it at least 3 times immediately.
Note that the screen will remain black. To verify that the tablet is actually in FEL mode,
lsusbwill displayBus ### Device ###: ID 1f3a:efe8 Onda (unverified) V972 tablet in flashing mode
sunxi-fel version yields:
AWUSBFEX soc=00001667(A33) 00000001 ver=0001 44 08 scratchpad=00007e00 00000000 00000000
While it is possible to query the device version at this stage, reading anything further results in failure with the error:
usb_bulk_send() ERROR -7: Operation timed out
Android Recovery mode
Pressing and holding the VOL- button along with the power button (for approximately 10 seconds) during start up triggers Android Recovery mode. This is not to be confused with FEL mode. The Android Recovery mode is identified by a screen that displays the following at the top of the screen:
Android Recovery
Allwinner/astar_ibt/astar-ibt
6.0.1/MOB30R/20170208
eng/test-keys
Adding a serial port (voids warranty)
There are no obvious UART connections on the mainboard.
This section explains how to attach a serial port to the device. Make sure it refers to our UART howto. For a development board, you can just mention how to find the header with the pins and include a picture, and you can remove the warranty voiding warning.
Device disassembly
There are 24 plastic pins to pop around the perimeter of the back cover. A plastic tool is highly recommended, particularly any <1 mm thick, high density plastic or otherwise rigid sheet-like edge that can be inserted into an initial gap and then run around the perimeter without buckling.
The most difficult segments to pop are the bottom right and bottom left corners, because they have pins in the middle of the corner curve. This also makes it particularly difficult to pop the right short side (the side with the mic port), and the left short side near the USB port. A suggested approach would be to pop as much as possible all around (including these difficult segments), then lever off the cover along one of the long edges.
Note also that the power and volume button moulding is a small, loose part that can fall out in the process.
The PCB is attached to the plastic housing by several (TBD) small screws, and also attached to ribbon cables. Complete disassembly instructions to be added.
Locating the UART
Describe how to find the RX,TX,GND signals here, and mention the UART howto. There are no obvious UART (RX, TX or GND) pins. Some of the 'TF card' [sic] slot pins produce signals during boot/operation, which may suggest that the UART is multiplexed with the microSD card and that a microSD breakout may be beneficial to access the UART.
Pictures
Take some pictures of your device, upload them, and add them here. DO NOT UPLOAD PICTURES WHICH YOU PLUCKED OFF THE INTERNET.
Schematic
List schematics, board layout, cad files, etc here.
Also known as
List rebadged devices here.
See also
Manufacturer images
Optional. Add non-sunxi images in this section.


