Topwise A721
| Topwise A721 | |
|---|---|
 | |
| Manufacturer | Topwise |
| Dimensions | 198mm x 117mm x 9.8mm |
| Release Date | February 2012 |
| Website | Missing product page. |
| Specifications | |
| SoC | A10 @ 1Ghz |
| DRAM | 512MiB @ 360MHz |
| NAND | 4/8GB |
| Power | DC 5V @ ?A, Unknown mAh 3.7V Li-Ion battery |
| Features | |
| LCD | 800x480 (7" 16:9) |
| Touchscreen | 5-finger capacitive/resistive (Manufacturer device FIXME) |
| Video | HDMI (Type C - mini) |
| Audio | 3.5mm headphone plug, HDMI, internal speaker, internal microphone |
| Network | WiFi 802.11 b/g/n (Realtek RTL8188CTV) |
| Storage | µSD |
| USB | 1 USB2.0 OTG |
| Camera | 0.3MP (640x480) front |
| Other | Accelerometer (Domintech DMARD06) |
| Headers | UART |
This page needs to be properly filled according to the New Device Howto and the New Device Page guide.
The "MID" formfactor was very popular in 2012. Therefor there are probably some variations with respect to the amount of NAND, camera and wifi modules.
There is some confusion, as to which device this is. The layout of the buttons and connectors seems to be compatible with the A710, but the board is crucially different.
In 2012, this board was also sold standalone, as the Gooseberry. The gooseberry forum now is abandoned and full of spam.
Identification
In android, under Settings->About Tablet, you will find:
- Model Number: MID
- Build Number: 20120323-A721.0.5.3
Sunxi support
Current status
Only the gooseberry board has been properly verified.
Images
HW-Pack
BSP
BSP works properly and is able to prepare bootable SD cards and LiveSuit images, as tested on gooseberry board.
Manual build
Warning: The below instructions are for the standalone gooseberry board, they might not be suited for an actual A721 tablet.
- For building u-boot, use the "Gooseberry_A721" target.
- The .fex file can be found in sunxi-boards as gooseberry_a721.fex
Everything else is the same as the manual build howto.
Tips, Tricks, Caveats
FEL mode
The Volume+ button triggers FEL mode.
Adding a serial port (voids warranty)
Device disassembly
Provide a short description of how to open the device. Perhaps explain how the pins can be most easily popped.
Locating the UART
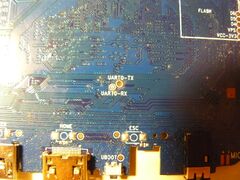
On the back of the board, there are pads marked "UART0-TX" and "UART0-RX". All you have to do is solder on some wires according to our UART howto.
Pictures
Take some pictures of your device, upload them, and add them here.
Also known as
There are probably tons of rebadgers, as this formfactor was very popular and got produced by several manufacturers.
Some possible suspects are:
- Lyric F1 (LY-F1), which probably also shipped with an A710 board.
- TomTop c1315
- DVC z7
- The bare board was also sold as the Gooseberry.
See also
- A710: has the same packaging, but a different board inside.


