Nintendo NES Classic Edition
| Nintendo NES Classic Edition | |
|---|---|
 | |
| Manufacturer | Nintendo |
| Dimensions | 130 x 100 x 42 mm |
| Release Date | November 2016 |
| Website | Device Product Page |
| Specifications | |
| SoC | R16 @ 1.2GHz |
| DRAM | 256MiB DDR3 @ 600MHz |
| NAND | 512MiB SLC |
| Power | DC 5V @ 1A (via OTG) |
| Features | |
| Video | HDMI (Type A - full) |
| Audio | HDMI |
| USB | 1 USB2.0 OTG |
| Other | 2 Gamepad |
| Headers | UART |
This page needs to be properly filled according to the New Device Howto and the New Device Page guide.
If a device is special, then feel free to provide a terse description of what makes this device so special. But terse, no novels, no marketing blurb.
Identification
On the back of the device, the following is printed:
- NES
MOD. CLV-001
- Famicom
MOD. CLV-101
Sunxi support
Current status
Give a brief overview of the current status of support under sunxi here.
Images
Optional. Add MANUFACTURER DEVICE specific sunxi ROM images here. E.g. a livesuit image or some other linux image which uses linux-sunxi code. Do not put non-sunxi images here, they should live under See also. If no sunxi based images are available, this section can be removed.
HW-Pack
Optional. Add MANUFACTURER DEVICE sunxi HW-pack specifics here. When empty, this section can be removed.
BSP
Optional. Add MANUFACTURER DEVICE sunxi BSP specifics here. When empty, this section can be removed.
Manual build
You can build things for yourself by following our Manual build howto and by choosing from the configurations available below.
U-Boot
Sunxi/Legacy U-Boot
Use the MANUFACTURER_DEVICE build target.
Mainline U-Boot
Use the Nintendo_NES_Classic_Edition_defconfig build target.
Linux Kernel
BSP Kernel
Use the nintendo_nes_classic_clv001.fex file.
Mainline kernel
Use the 'sun8i-r16-nintendo-nes-classic.dtb' device-tree binary.
Use the 'sun8i-r16-nintendo-super-nes-classic.dtb' device-tree binary.
Tips, Tricks, Caveats
Add MANUFACTURER DEVICE specific tips, tricks, Caveats and nice to have changes here.
FEL mode
The RESET button triggers FEL mode. Alternatively, send the character '2' to UART (DRAM is NOT initialized), or run 'fastboot' command on stock U-Boot (DRAM is initialized).
To verify you have successfully entered FEL mode, check the output of sunxi-fel version. For the Nintendo NES Classic Edition, it should look like:
AWUSBFEX soc=00001667(A33) 00000001 ver=0001 44 08 scratchpad=00007e00 00000000 00000000
Stock U-Boot
To enable boot0 debug mode (it gives command prompt on U-Boot), send the character 's' to UART.
key_press
0x00000073
HELLO! BOOT0 is starting!
boot0 version : 4.2.0
boot0 commit : 2f04d11e4dfd9d5022e33833412462859727bdcc

fel_flag = 0x00000000
rtc[0] value = 0x00000000
rtc[1] value = 0x00000000
rtc[2] value = 0x00000000
rtc[3] value = 0x00000000
DRAM DRIVE INFO: V1.7
DRAM Type =3 (2:DDR2,3:DDR3,6:LPDDR2,7:LPDDR3)
DRAM zq value: 00003bbbDRAM CLK =600 MHZ
ID CHECK VERSION: V0.1
using ic R16
USE PLL DDR1
USE PLL NORMAL
PLL FREQUENCE = 1200 MHZ
DRAM PLL DDR1 frequency extend open !
DRAM master priority setting ok.
Auto calculate timing parameter!
para_dram_tpr0 = 0047a14f
para_dram_tpr1 = 01c2294c
para_dram_tpr2 = 00069049
tcl = 6,tcwl = 4
DRAM TIMING PARA0 = 0b0f180c
DRAM TIMING PARA1 = 0003040f
DRAM TIMING PARA2 = 0406050a
DRAM TIMING PARA3 = 0000400c
DRAM TIMING PARA4 = 05020405
DRAM TIMING PARA5 = 05050403
DRAM TIMING PARA8 = 90003310
DRAM PHY INTERFACE PARA = 02040102
DRAM VTC is disable
DRAM dynamic DQS/DQ ODT is on
DRAM DQS gate is PD mode.
DRAM one rank training is on,the value is 91003587
DRAM work mode register value = 004318d4
DRAM SIZE =256 M
set one rank ODTMAP
DRAM simple test OK.
dram size =256
block from 4 to 39
nand block 4 is bad
nand block 5 is bad
nand block 6 is bad
nand block 7 is bad
current block is 8 and last block is 39.
current block is 9 and last block is 39.
current block is 10 and last block is 39.
current block is 11 and last block is 39.
current block is 12 and last block is 39.
sum=0a401204
src_sum=0a401204
The file stored in start block %u is perfect.
Ready to disable icache.
Jump to secend Boot.
[      0.334]

U-Boot 2011.09-rc1 (Aug 30 2016 - 12:07:36) Allwinner Technology

[      0.341]version: 1.1.0
[      0.344]uboot commit : 2f04d11e4dfd9d5022e33833412462859727bdcc

ready
no battery, limit to dc
dram_para_set start
dram_para_set end
[      0.450]DRAM:  256 MiB
relocation Offset is: 07b73000
board.c 621
smcl's set manager is NULL
lcd_panel_fun[0].cfg_panel_info is NULL
lcd_panel_fun[0].cfg_open_flow is NULL
Using default environment

In:    serial
Out:   serial
Err:   serial
--------fastboot partitions--------
mbr not exist
base bootcmd=sunxi_flash phy_read 43800000 30 20;boota 43800000
bootcmd set setargs_nand
key 0
cant find rcvy value
cant find fstbt value
no misc partition is found
to be run cmd=sunxi_flash phy_read 43800000 30 20;boota 43800000
WORK_MODE_BOOT
board_status_probe
[      0.581]power trigger
gpio_set_one_pin_io_status ret = 0
gpio_read_one_pin_value value = 0
power switch on
[      0.591]Hit any key to stop autoboot:  0
clover#
HDMI
EPMI EP952 bridge chip is used.
Gamepad
compatible with Wii Classic Controller. (i.e. I2C)
PG3/PG2 are used to detect controllers. (HIGH: connected)
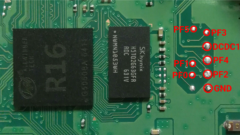
PF0-PF5 (SDC0)
There are PF0-PF5 and DCDC1 on SIDE-B. They can be used for SDC0.
Device specific topic
If there are no further device specific topics to add, remove these sections.
...
Adding a serial port (voids warranty)
This section explains how to attach a serial port to the device. Make sure it refers to our UART howto. For a development board, you can just mention how to find the header with the pins and include a picture, and you can remove the warranty voiding warning.
Device disassembly
If necessary, provide a short description of how to open the device. Perhaps explain how the pins can be most easily popped. If pins do need to be popped, mention the Plastic tool howto.
Locating the UART
Describe how to find the RX,TX,GND signals here, and mention the UART howto.
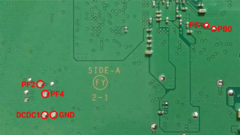
There are PB0/PB1 (for mainline) and PF2/PF4 (for stock firmware) on SIDE-A.
If you want to use the PF2/PF4 pins using the mainline U-Boot, you'll need to change CONS_INDEX to 1, and set UART0_PORT_F in menuconfig.
Pictures
Take some pictures of your device, upload them, and add them here. DO NOT UPLOAD PICTURES WHICH YOU PLUCKED OFF THE INTERNET.
Also known as
Nintendo GPL Violations
Nintendo uses the A33/R16 in its products. Nintendo provides a source code zipfile on their website, in an attempt to comply with open source licenses, but Nintendo ends up distributing the same binaries that Allwinner has been distributing with it's supposed source code releases before.
U-Boot GPL Violations
In the subdirectory called r16-uboot-fc3061df4dbd4153819b2d2f141d82b88fea51cf, a patched u-boot 2011-09-rc1, the following binaries can be found:
./nand_sunxi/sun8iw3/libnand-sun8iw3
./nand_sunxi/sun8iw1/libnand-sun8iw1
./nand_sunxi/sun8iw8/libnand-sun8iw8
./nand_sunxi/sun9iw1/libnand-sun9iw1
./nand_sunxi/sun7i/libnand-sun7i
./nand_sunxi/sun8iw9/libnand-sun8iw9
./nand_sunxi/sun8iw7/libnand-sun8iw7
./nand_sunxi/sun5i/libnand-sun5i
./nand_sunxi/sun8iw6/libnand-sun8iw6
./arch/arm/cpu/armv7/sun8iw5/dram/libdram-riot
./arch/arm/cpu/armv7/sun8iw5/dram/libdram
./arch/arm/cpu/armv7/sun8iw8/dram/libdram
./arch/arm/cpu/armv7/sun9iw1/dram/libdram
./arch/arm/cpu/armv7/sun8iw9/dram/libdram
./arch/arm/cpu/armv7/sun8iw7/dram/libchipid
./arch/arm/cpu/armv7/sun8iw7/dram/libdram
./arch/arm/cpu/armv7/sun8iw6/dram/libdram-homlet
./arch/arm/cpu/armv7/sun8iw6/dram/libdram-pad
./drivers/video_sunxi/sunxi_v1/obj_video
./drivers/video_sunxi/sunxi_v2/de_bsp/hdmi/aw/libhdcp
./drivers/video_sunxi/sunxi_v2/de_bsp/de/lowlevel_sun9iw1/libdsi
./drivers/video_sunxi/sunxi_v2/de_bsp/de/lowlevel_sun9iw1/libedp
./drivers/video_sunxi/sunxi_v2/obj_video
./drivers/video_sunxi/sunxi_v3/obj_video
Kernel GPL Violations
In the subdirectory called linux-9ed0e6c8612113834e9af9d16a3e90b573c488ca, a variation of linux-3.4.112, the following binaries can be found:
./arch/arm/mach-sunxi/pm/standby/sun9i_resume1_scatter.scat
./arch/arm/mach-sunxi/pm/standby/sun8i_resume1_scatter.scat
./arch/arm/mach-sunxi/pm/standby/standby.xn
./arch/arm/mach-sunxi/pm/standby/gen_check_code
./modules/aw_schw/libschw
./modules/nand/sun8iw1p1/libnand_sun8iw1p1
./modules/nand/sun8iw3p1/libnand_sun8iw3p1
./modules/nand/sun8iw5p1/libnand_sun8iw5p1
./modules/nand/sun9iw1p1/libnand_sun9iw1p1
./modules/nand/sun8iw6p1/libnand_sun8iw6p1
./drivers/video/sunxi/disp/de/lowlevel_sun9iw1/libdsi
./drivers/video/sunxi/disp/de/lowlevel_sun9iw1/libedp
./drivers/video/sunxi/hdmi/aw/libhdcp
./drivers/input/touchscreen/aw5x06/libAW5306
./drivers/input/touchscreen/gslx680new/gsl_point_id_20131111
./drivers/input/touchscreen/ft5x/ft_app.i
./drivers/usb/sunxi_usb/usb3/libusb300
./drivers/media/video/sunxi-fd/lib/libfd
./drivers/media/video/sunxi-vfe/lib/libisp
./drivers/media/video/sunxi-vfe/lib/lib_mipicsi2_v1
./drivers/media/video/sunxi-vfe/lib/lib_mipicsi2_v2
./drivers/media/video/sunxi-vfe/test/app_basic
See also
- About OSS included in the Nintendo Entertainment System: NES Classic Edition (Nintendo Classic Mini: Nintendo Entertainment System) console
- http://mazu-bunkai.com/bunkai-wp/review/4313/
- http://honeylab.hatenablog.jp/entry/2016/12/19/230144
- https://www.ns-koubou.com/blog/2016/11/11/nes_classic/
- https://www.ns-koubou.com/blog/2016/11/16/nes_classic_hdmi/
- https://www.ns-koubou.com/blog/2016/11/17/doom_on_nes_classic/
- https://blog.urandom.team/post/my-linux-kernel-on-nesclassic/
- http://emuonpsp.net/old_news_236.html
Manufacturer images
Optional. Add non-sunxi images in this section.


