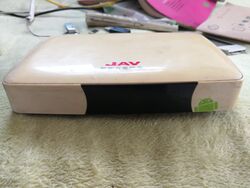
JAV Box V10
| JAV Box V10 | |
|---|---|
 | |
| Manufacturer | JAV |
| Dimensions | width180 x breadth130 x height32 |
| Release Date | Month year |
| Website | Device Product Page |
| Specifications | |
| SoC | A10 @ 1Ghz |
| DRAM | 512MiB DDR3 @ 1333MHz (PE937-15E) * 2 |
| NAND | 2/4/8/16GB |
| Power | DC 5V @ 2A |
| Features | |
| Video | HDMI (Type A - full) |
| Network | WiFi 802.11 b/g/n (Realtek RTL8188ETV), 10/100Mbps Ethernet (Realtek RTL8201CP) |
| Storage | NAND |
| USB | 1 USB2.0 Host, 1 USB2.0 OTG |
| Headers | UART |
This page needs to be properly filled according to the New Device Howto and the New Device Page guide.
Identification
On the back of the device, the following is printed:
JAV
Model: Box-V10(single core)
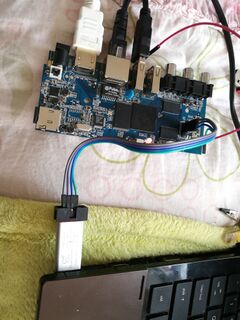
The PCB has the following silkscreened on it:
JNDZ_A20_V1.1
The chips on the motherboard:
CPU
All Winner TECH
A10
D1058CA 6251
DDR3 SDRAM
SPECTEK
PE937-15E (*2)
F1336
NAND
sk hynix
H27UBG8T2BTR
BC     381A
AXP209
D7009CB 3AC1
Wireless
REALTEK
RTL8188ETV
D803931
GD39 TAIWAN
Pulse
H1102NL
1336-G CHINA
Ethernet
REALTEK
RTL8201CP
D7D93P2
LD360 TAIWAN
10/100M
Sunxi support
Current status
Following the manual build guild. it can be boot with mainline u-boot and mainline kernel.
USB works fine. but the default mainline kernel config needs some additional twist to make it work.
but the wifi support on the mainline kernel is WIP.
Ethernet works fine but u-boot needs a little change if you want it during u-boot.
the wired things is that I don't know why the u-boot mii bus can't get a correct PHY_ID and Ethernet initialed fail. so I create it myself.
The HDMI turns to black screen after kernel starts. the Kernel code needs a little twists to make sun4i-drm works properly.
Manual build
You can build things for yourself by following our Manual build howto and by choosing from the configurations available below.
U-Boot
Sunxi/Legacy U-Boot
I try the tinycore introduction. choose the Cubieboard-512MB target.
Mainline U-Boot
Use the MANUFACTURER_DEVICE build target.
Linux Kernel
Mainline kernel
Use the FAMILY-CHIP-DEVICE.dtb device-tree binary.
Tips, Tricks, Caveats
There are 4 things I changed compare the manufacture board:
- I solid the serial slot.
- I solid the SD card slot.
- I solid an additional 2 pins near the small socket.
- I resolid the LED and the remote receive component. The LED is only 1 color before on the small panel board. I change it to 2 color on main board.
FEL mode
The is a pin at the edge named "KEY". short it when power on you will get to FEL.
Device specific topic
1 There is wired the mainline u-boot can't get the Ethernet RTL8021CP 's Phy_id properly.
diff --git a/drivers/net/sunxi_emac.c b/drivers/net/sunxi_emac.c
index d15b0add7c..845d449f41 100644
--- a/drivers/net/sunxi_emac.c
+++ b/drivers/net/sunxi_emac.c
@@ -273,6 +273,11 @@ static int sunxi_emac_init_phy(struct emac_eth_dev *priv, void *dev)

        priv->phydev = phy_find_by_mask(priv->bus, mask,
                                        PHY_INTERFACE_MODE_MII);
+       /*magic part. i create it myself*/
+       if (!priv->phydev) {
+               priv->phydev = phy_device_create(priv->bus, 9, 0x00008201, false, PHY_INTERFACE_MODE_MII);
+       }
+
        if (!priv->phydev)
                return -ENODEV;
2 HDMI works in mainline kernel needs the source to change a little bit to make it work.
diff --git a/drivers/gpu/drm/sun4i/sun4i_tcon.c b/drivers/gpu/drm/sun4i/sun4i_tcon.c
index 88db2d2a9336..7d9afb2a6efa 100644
--- a/drivers/gpu/drm/sun4i/sun4i_tcon.c
+++ b/drivers/gpu/drm/sun4i/sun4i_tcon.c
@@ -1454,7 +1454,7 @@ static int sun8i_r40_tcon_tv_set_mux(struct sun4i_tcon *tcon,
 }

 static const struct sun4i_tcon_quirks sun4i_a10_quirks = {
-       .has_channel_0          = true,
+/*     .has_channel_0          = true,*/
        .has_channel_1          = true,
        .dclk_min_div           = 4,
        .set_mux                = sun4i_a10_tcon_set_mux,
Adding a serial port (voids warranty)
I solid 4 pins on the board. for more please refer to UART howto .
Device disassembly
It's very easy to open it. only at the back, unscrew 4 screws.
Locating the UART
The UART is shown at the back of the board. I solid the slot myself. for more please see UART howto.
Pictures
Also known as
My guess: It's similarly with: Mele A1000 Cubieboard


