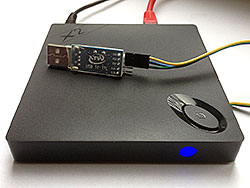
Beelink X2
| Beelink X2 | |
|---|---|
 | |
| Manufacturer | Roofull Technologies |
| Dimensions | 110mm x 110mm x 17.5mm |
| Release Date | June 2015 |
| Website | |
| Specifications | |
| SoC | H3 @ 1.2Ghz |
| DRAM | 1GiB DDR3 (different batches use different modules) |
| NAND | 8GB (eMMC 4.51), FORESEE NCEFES78-08G |
| Power | DC 5V @ 2A |
| Features | |
| Video | HDMI (Type A - full) |
| Audio | SPDIF |
| Network | WiFi 802.11 b/g/n (AMPAK AP6181), 10/100Mbps Ethernet (H1601NL PLY) |
| Storage | µSD |
| USB | 1 USB2.0 Host, 1 OTG as type A |
| Other | IR receiver for remote |
| Headers | UART (internal), unknown 4-pin (internal) |
This page needs to be properly filled according to the New Device Howto and the New Device Page guide.
The Beelink X2 is an inexpensive TV box/multimedia player based on Allwinner's H3 SoC.
Identification
"X2" logo embossed on top cover of the device.
In android, under Settings->About box, you will find:
- Model Number: XII
- Build Number: 4.4.2 KOT49H 20151105 test-keys
- Vendor Software Version: 203k4
A newer version shows in Android, (bought 29.09.2016 ships from Germany):
- Model Number: XII
- Build Number: 4.4.2 KOT49H 20160423 test-keys
- Vendor Software Version: 208k4
Another one
- Model Number: XII
- Build Number: 4.4.2 KOT49H 20160503 test-keys
- Vendor Software Version: 209k4
My version shows in Android, (bought 30.06.2017 ships from china
- Model Number: X2-A
- Firmware Version: Homlet4.4.4-qin2-v1.0release
- Build Number: 4.4.2KOT49H 20170608 test-keys
- Vendor software version: 300k4
Sunxi support
Current status
Beelink X2 is currently supported by both mainline U-Boot and kernels.
Images
Armbian fully supports Beelink X2 starting with version 5.15 (see the relevant thread for details and tweaks). Given the minor differences when comparing the fex files between several Orange Pis and Beelink X2 it should be relatively easy to provide OS images using mainline kernel later. Only one caveat: Like a few other H3 devices the X2 tends to overheat so unless THS stuff for H3 devices isn't ready in mainline kernel it's not recommended to use kernel 4.x due to missing throttling.
Manual build
You can build things for yourself by following our Manual build howto and by choosing from the configurations available below.
U-Boot
Mainline U-Boot
Use the beelink_gs1_defconfig (supported since v2019.10) build target.
Write u-boot-sunxi-with-spl.bin to an SD card with "dd if=u-boot-sunxi-with-spl.bin of=/dev/[SD] bs=1024 seek=8 conv=notrunc"
Linux Kernel
Mainline kernel
Use the sun8i-h3-beelink-x2.dtb (supported since v4.11) device-tree binary.
Tips, Tricks, Caveats
The X2 is configured to boot from µSD first, so testing an alternative OS is simple. Linux images for other H3 devices can be booted, but provide incorrect GPIO assignments for at least the power LED, USB ports and so on. The most up to date fex file for the device might be in Armbian github repository
FEL mode
The button on the bottom of the PCB triggers FEL mode (to be confirmed). It is reachable through a small hole in the bottom plastic cover. The X2 exposes H3's USB OTG port as a type A receptacle on the back next to the power socket which can be used with a male-to-male type A USB cable. This will also provide power to the X2.
WiFi
PCB revision 3.0 came with AP6181 WiFi which has been replaced by RTL8189ETV (as used on the older H3 Orange Pis, eg. Orange Pi Plus). Pin mapping remained the same so no need to modify fex or device tree contents, just a different driver is needed.
Adding a serial port (voids warranty)
The X2 UART runs at 3.3V levels, so you need a level converter (e.g. MAX3323) to connect the board to a regular serial port. Alternatively, a USB-to-UART adapter with 3.3V levels will also work. See the UART howto for details.
Device disassembly
The case is clipped together using plastic tabs on all four sides. Please see the Plastic tool howto for details of opening cases like these. The PCB is held in place by four small Philips-head screws. Make sure to remove the µSD card before taking out the PCB. The H3 chip is attached to an internal heat sink using a thermal pad.
If you are unsure how to open the case, this disassembly video might also help.
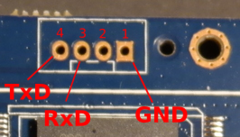
Locating the UART
The UART (3.3V levels) is available on four solder holes (2mm spacing) next to the µSD slot. Soldering in a header will void the warranty.
With the square pad as pin 1 (i.e., counting from right to left in the photo), the pinout is as follows confirmed using USB-UART adapter:
- Pin 1: GND
- Pin 2: ???
- Pin 3: RxD
- Pin 4: TxD
Pictures
Also known as
TRONFY X2, Keedox Smart TV Box
See also
- Thread on the X2 with details of firmware updates at freaktab
Running Linux on the X2Archive.org memento- DRAM data sheet (Deutron)
Manufacturer images
Optional. Add non-sunxi images in this section.


