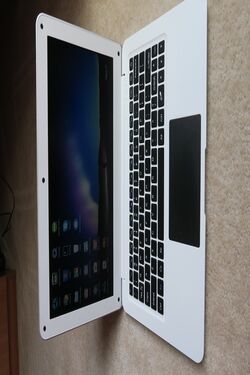
Azpen hybrx
| Azpen hybrx | |
|---|---|
 | |
| Manufacturer | Azpen Innovation |
| Dimensions | 295mm x 198mm x 18mm |
| Release Date | December 2016 |
| Website | https://www.azpeninnovation.com/collections/tablets/products/azpen-hybrx |
| Specifications | |
| SoC | A64 @ XGhz |
| DRAM | 1GiB/2GiB DDR3 @ xxxMHz |
| NAND | 16/32/64GB |
| Power | DC 5V @ 3A 3.5mm socket compatible with SCP-2009A plug, 6000mAh 3.7V Li-Ion battery |
| Features | |
| LCD | 1366x768 (11.6") |
| Touchscreen | none |
| Video | HDMI (Type B - mini) |
| Audio | 3.5mm headphone plug, 3.5mm microphone plug, HDMI, internal stereo speakers, internal microphone |
| Network | WiFi 802.11 b/g/n (RTL8723BS) |
| Storage | µSD |
| USB | 2 USB2.0 Host |
| Camera | 0.480MP (800x600) front |
| Other | Accelerometer (Manufacturer device), GPS |
| Headers | UART, JTAG, LCD, VGA, ... |
This page needs to be properly filled according to the New Device Howto and the New Device Page guide.
If a device is special, then feel free to provide a terse description of what makes this device so special. But terse, no novels, no marketing blurb.
Identification
This section explains how to most easily identify your device. For a development board, explain the name(s) printed on the board. For an android device, find out the strings as reported under settings.
On the back of the device, the following is printed:
Model: A1160
www.azpenpc.com
The PCB has the following silkscreened on it:
INET-A311-REV02
Zeng-gc-2016-07-28
In android, under Settings->About Tablet, you will find:
- Model Number: A1160
- Build Number: 5.1.1-B2016092602
Sunxi support
Current status
Give a brief overview of the current status of support under sunxi here.
Images
Optional. Add MANUFACTURER DEVICE specific sunxi ROM images here. E.g. a livesuit image or some other linux image which uses linux-sunxi code. Do not put non-sunxi images here, they should live under See also. If no sunxi based images are available, this section can be removed.
HW-Pack
Optional. Add MANUFACTURER DEVICE sunxi HW-pack specifics here. When empty, this section can be removed.
BSP
Optional. Add MANUFACTURER DEVICE sunxi BSP specifics here. When empty, this section can be removed.
Manual build
You can build things for yourself by following our Manual build howto and by choosing from the configurations available below.
U-Boot
Sunxi/Legacy U-Boot
Use the MANUFACTURER_DEVICE build target.
Mainline U-Boot
Use the MANUFACTURER_DEVICE build target.
Linux Kernel
Sunxi/Legacy Kernel
Use the MANUFACTURER_DEVICE.fex file.
Mainline kernel
Use the FAMILY-CHIP-DEVICE.dtb device-tree binary.
Tips, Tricks, Caveats
The Azpen Hybrix hardware is similar to the Pine64 board. With an external monitor connected to the Azpen Hybrix mini-HDMI connector a number of the SD card images on http://wiki.pine64.org/index.php/Pine_A64_Software_Release will boot. The Ubuntu Mate provides a pretty usable environment on the machine. However, the device tree does not describe the LCD panel appropriately for this machine, so nothing comes up on the LCD panel. The battery information also seems to be missing.
The Pine64 kernels from the "pine64-hacks-1.2" branch of https://github.com/longsleep/linux-pine64.git can be built locally on the Ubuntu Mate environment and the resulting Image file boots successfully on the Azpen Hybrix.
Borrowing the devices tree information from the original ReMix OS or Phoenix OS DT to initialization the LCD panel with the Pinebook kernel doesn't work. It looks like a number of the parameters for LCD panel initialization are hard coded in lcd_edp_anx9804.c and the values between the Azpen Hybrx and Pinebook differ.
FEL mode
A Bootable SD card can be used to put the Azpen Hybrx into FEL mode. There doesn't appear to be button to trigger FEL mode.
Device specific topic
If there are no further device specific topics to add, remove these sections.
...
Adding a serial port (voids warranty)
This section explains how to attach a serial port to the device. Make sure it refers to our UART howto. For a development board, you can just mention how to find the header with the pins and include a picture, and you can remove the warranty voiding warning.
Device disassembly
If necessary, provide a short description of how to open the device. Perhaps explain how the pins can be most easily popped. If pins do need to be popped, mention the Plastic tool howto.
Locating the UART
Describe how to find the RX,TX,GND signals here, and mention the UART howto.
Pictures
Take some pictures of your device, upload them, and add them here. DO NOT UPLOAD PICTURES WHICH YOU PLUCKED OFF THE INTERNET.
Also known as
List rebadged devices here.
See also
Add some nice to have links here. This includes related devices, and external links.
Manufacturer images
Optional. Add non-sunxi images in this section.


