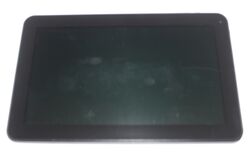
Yones Toptech BS1078 V2
| Yones Toptech BS1078 V2 | |
|---|---|
 | |
| Manufacturer | Yones TopTech |
| Dimensions | 260mm x 165mm x 10mm |
| Release Date | January 2014 |
| Website | Device Product Page |
| Specifications | |
| SoC | A31s @ 1.2Ghz (Quad-core Cortex-A7) |
| DRAM | 1GiB DDR3 @ xxxMHz |
| NAND | 8GB |
| Power | USB, DC 5V @ 2A, 6000mAh 3.7V Li-Ion battery |
| Features | |
| LCD | 1024x600 (10.1" 16:9) |
| Touchscreen | 5-finger capacitive (SiLead GSL3675) |
| Video | HDMI (Type C - mini) |
| Audio | 3.5mm headphone plug, HDMI, internal stereo speakers, internal microphone |
| Network | WiFi 802.11 b/g/n (RTL8723AS) (USB Module) |
| Storage | µSD |
| USB | 1 USB2.0 Host, 1 USB2.0 OTG |
| Camera | 0.3MP (640x480) front, 2.0MP (1600x1200)rear |
| Other | Accelerometer (Manufacturer device) |
This page needs to be properly filled according to the New Device Howto and the New Device Page guide.
Identification
The PCB has the following silkscreened on it:
YONESTOPTECH-BS1078-20140125 V2-
In android, under Settings->About Tablet, you will find:
- Model Number: Q102
- Build Number: fiber_q102-eng 4.4.2 KOT49H DDR420 20140621
Sunxi support
Current status
Able to boot to serial console using mainline A31-Hummingbird dts and mainline kernel using sunxi_defconfig and root file system built with buildroot.
Images
HW-Pack
BSP
Manual build
No support in the community maintained sunxi-3.4 kernel is planned. Please skip to the next Mainline U-Boot/Mainline kernel sections.
Mainline U-Boot
Working on a real U-Boot defconfig for this tablet
For building mainline U-Boot, use the Hummingbird_A31_defconfig target.
Mainline kernel
Working on a real dts for this tablet
Use the sun6i-a31s-yones-toptech-bs1078-v2.dts device-tree file for the mainline kernel.
- Use the rtl8723au driver in the staging drivers for WIFI. Setting ht_enable=0 when loading the driver to disable 802.11n seems to work better. With 802.11n enabled, the driver drops packets.
Tips, Tricks, Caveats
FEL mode
The something button triggers FEL mode.
...
Adding a serial port (voids warranty)
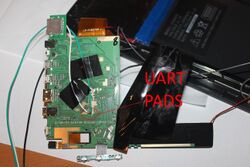
Use the UART pads and an appropriate level shifter to attach a serial port to the tablet.
See the "Locating the UART" section for information on where the UART pads are located at.
See UART howto for information on how to communicate with the UART.
Device disassembly
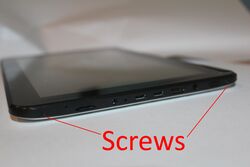
Remove two metal screws on the right side of the device then use a guitar pick style plastic opening tool to separate the back panel from the tablet. See also Plastic tool howto.
Locating the UART
On the backside of the board there are two test points marked RX and TX which are the serial port. The entire back of the board is covered in black tape that must be peeled off to expose the the test points. After soldering wires to the test points, it is no longer possible to screw the board back into the case because of the thickness of the wires .
See UART howto for information on how to communicate with the UART.
Pictures
Take some pictures of your device, upload them, and add them here. DO NOT UPLOAD PICTURES WHICH YOU PLUCKED OFF THE INTERNET.


