TrimUI Model S
| TrimUI Model S | |
|---|---|
 | |
| Manufacturer | TrimUI |
| Dimensions | 105mm x 55mm x 9.5mm |
| Release Date | 2020 |
| Website | Device Product Page |
| Specifications | |
| SoC | F1C200s @ XGhz |
| DRAM | 64MiB DDR1 @ xxxMHz |
| NAND | 128MB |
| Power | DC 5V @ 500mA, 600mAh 3.7V Li-Ion battery |
| Features | |
| LCD | 320x240 (2.0" 3:4) |
| Audio | internal speaker |
| Storage | µSD |
| USB | 1 USB2.0 Type-C OTG |
This page needs to be properly filled according to the New Device Howto and the New Device Page guide.
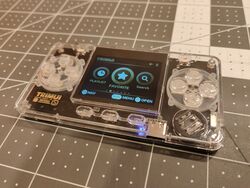
A small portable game console, designed to run retro game emulators (NES, Gameboy, etc).
Identification
"TRIMUI MODEL S" is printed on the back of the device as well as the front of the PCB (visible through the clear front casing)
Sunxi support
Current status
Give a brief overview of the current status of support under sunxi here.
Images
Optional. Add MANUFACTURER DEVICE specific sunxi ROM images here. E.g. a livesuit image or some other linux image which uses linux-sunxi code. Do not put non-sunxi images here, they should live under See also. If no sunxi based images are available, this section can be removed.
HW-Pack
Optional. Add MANUFACTURER DEVICE sunxi HW-pack specifics here. When empty, this section can be removed.
BSP
Optional. Add MANUFACTURER DEVICE sunxi BSP specifics here. When empty, this section can be removed.
Manual build
You can build things for yourself by following our Manual build howto and by choosing from the configurations available below.
U-Boot
Sunxi/Legacy U-Boot
Only useful for A10/A10s/A13 and A20 based devices. Remove this section otherwise.
Use the MANUFACTURER_DEVICE build target.
Mainline U-Boot
Use the MANUFACTURER_DEVICE build target.
Linux Kernel
Sunxi/Legacy Kernel
Only useful for A10/A10s/A13 and A20 based devices. Remove this section otherwise.
Use the MANUFACTURER_DEVICE.fex file.
Mainline kernel
Use the FAMILY-CHIP-DEVICE.dtb device-tree binary.
Tips, Tricks, Caveats
Add MANUFACTURER DEVICE specific tips, tricks, Caveats and nice to have changes here.
FEL mode
Turn off the device, remove the uSD card. The uSD card must be removed, otherwise the device will boot normally. Hold the "L" and "R" shoulder buttons while turning the device on.
Device specific topic
If there are no further device specific topics to add, remove these sections.
...
Adding a serial port (voids warranty)
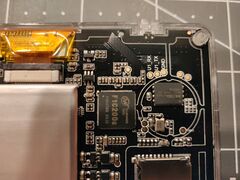
There are UART test pads inside the device. You will need to solder jumper wires to access them, see UART howto for details.
Device disassembly
Unscrew the four self-tapping Torx T6 screws from the back of the device. Remove the aluminum back panel and the plastic spacer.
Locating the UART
The UART test pads are near the NAND flash chip, labeled U1_RX, U1_TX, and GND.
Pictures
Take some pictures of your device, upload them, and add them here. DO NOT UPLOAD PICTURES WHICH YOU PLUCKED OFF THE INTERNET.
Schematic
List schematics, board layout, cad files, etc here.
Also known as
PowKiddy A66
See also
Unofficial wiki: https://github.com/tiduscrying/trimui-model-s-wiki


