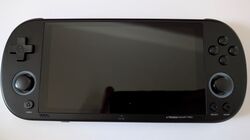
TRIMUI Smart Pro
| TRIMUI Smart Pro | |
|---|---|
 | |
| Manufacturer | TRIMUI |
| Dimensions | 180mm x 17mm x 80mm |
| Release Date | November 2023 |
| Website | Device Product Page |
| Specifications | |
| SoC | A133 Plus @ 2.0Ghz |
| DRAM | 1GiB LPDDR4 @ 792MHz |
| NAND | none |
| Power | DC 5V @ 3A, 5000mAh 3.7V Li-Ion battery |
| Features | |
| LCD | 1280x720 (4.9" 16:9) |
| Touchscreen | none |
| Video | none |
| Audio | 3.5mm headphone plug, 3.5mm microphone plug, internal stereo speakers, internal speaker, internal microphone |
| Network | WiFi 802.11 b/g/n (XR819) |
| Storage | µSD, 8GB eMMC |
| USB | 1 USB2.0 Host, 1 USB2.0 OTG |
| Camera | none |
| Other | Vibration motor, analog joysticks |
The TRIMUI Smart Pro is a handheld console. It is notable for being one of the only known devices using the A133 Plus, an A100 binning that supports up to 2.0GHz CPU frequencies.
There appear to be multiple revisions of this device; please add images if you come across this wiki page and have the older revision.
This page needs to be properly filled according to the New Device Howto and the New Device Page guide.
Identification
On the back of the device, the following is printed:
MODEL: TG5020 ● TRIMUI SMART PRO
DESIGN BY TRIMUI ● MADE IN CHINA
The PCB has the following silkscreened on it:
2024.07.5
TRIMUI SMART PRO
A133 V5.0
Sunxi support
Current status
The A100 series currently has basic support in the mainline Linux kernel; important features are missing that would be required for this device to be of any use, including:
- ADC
- PWM
- Display
- GPU
Additionally, there is no support for A133/A133P clock tables, restricting max clocks to 1.4GHz.
As for U-Boot, there is no mainline support yet; progress has been made towards patches, but those are incomplete for the time being.
Manual build
You can build things for yourself by following our Manual build howto and by choosing from the configurations available below.
U-Boot
Mainline U-Boot
No official support yet; implementation work is in progress
Linux Kernel
Mainline kernel
No official support yet; implementation work is in progress
Tips, Tricks, Caveats
FEL mode
When running stock firmware, navigate to Setting > System > Flash mode to enter FEL mode. There are also tinned, unpopulated pads for a button to enter FEL mode, located at the bottom of the board. Shorting the left and right sides while pressing the power button will forcibly enter FEL mode.
Adding a serial port (voids warranty)
Device disassembly
If necessary, provide a short description of how to open the device. Perhaps explain how the pins can be most easily popped. If pins do need to be popped, mention the Plastic tool howto.
There are four Phillips head screws on the back of the Smart Pro that need to be unscrewed. Then you will need to pop pins with a plastic tool along the perimeter of the back of the case.
Following that, carefully pull the back of the case away from the front, and unplug the WiFi antenna/rear vibration motor from the mainboard.
Locating the UART
There are 3 pads on the left side of the board near the A133P, right next to the LPDDR4 chips. They are helpfully labelled "RX", "TX" and "GND". Follow the UART howto for further steps.
Pictures
Take some pictures of your device, upload them, and add them here. DO NOT UPLOAD PICTURES WHICH YOU PLUCKED OFF THE INTERNET.
See also
Add some nice to have links here. This includes related devices, and external links.


