Sg.Gme.R3.95h5a tw
| Sg.Gme.R3.95h5a tw | |
|---|---|
 | |
| Manufacturer | Unknown |
| Dimensions | width171 x height157mm |
| Release Date | Month year |
| Specifications | |
| SoC | A13 |
| DRAM | 512MiB/1GiB/2GiB DDR3 @ xxxMHz |
| NAND | 2/4/8/16GB |
| Power | DC 12V |
| Features | |
| Video | HDMI full, VGA |
| Audio | 3.5mm headphone plug, internal mono speaker |
| Network | None |
| Storage | µSD |
| USB | X USB2.0 Host, X USB2.0 OTG [to be confirmed] |
| Headers | yet to be found |
This page needs to be properly filled according to the New Device Howto and the New Device Page guide.
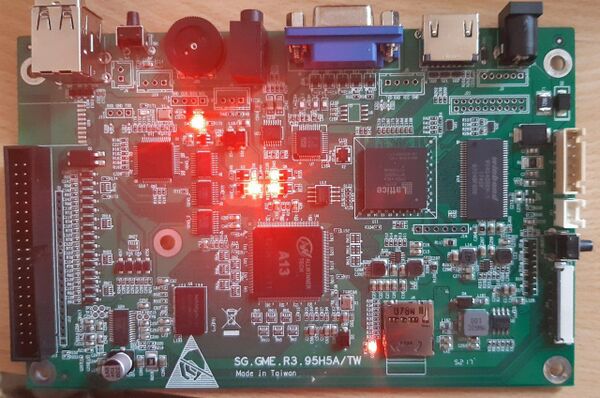
This is the PCB
Identification
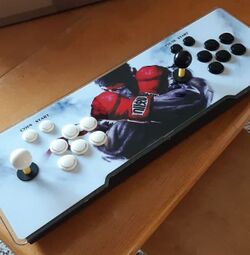
This is a so called "Pandora's box 5s". According to what I found online (mostly on youtube), that very case is also sold with a different PCB (mine has a button on the right to adjust screen tearing while other ones did not feature that), while also the same PCB is found in different looking cases (different graphics, different shape of the board or buttons layout). So it is impossible to distinguish the content according to the shell according to my findings.
On the back of the device, there is nothing printed. Literally nothing.
The PCB has the following silkscreened on it:
Sg.Gme.R3.95h5a/TW
It boots a Linux OS that is stored into an 8GB microSD card with what looks like a proprietary frontend and the MAME emulator. I found a modified version of the OS as well that also runs Linux; with the well-known open source softwares "retroarch" and the frontend "emulation station". To run that in place of the original I just had to replace the SD card.
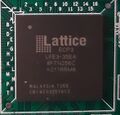
There is a Lattice FPGA chip (pictured below) that is maybe used for the HDMI output.
Sunxi support
Current status
The original system is already running Linux and proprietary userspace binaries. I found an alternative image which I like better and that also runs Linux. I am still trying to figure out useful informations out of those system images. There are no source codes whatsoever available.
Images
- This is the boot partition of the original image, which is not provided as a whole as it contains copyright material.
- This is the boot partition of the alternative image I found (also known as "RetroPan", which stands for "RetroArch Pandora), with the same limitations as above.
HW-Pack
Optional. Add MANUFACTURER DEVICE sunxi HW-pack specifics here. When empty, this section can be removed.
BSP
Optional. Add MANUFACTURER DEVICE sunxi BSP specifics here. When empty, this section can be removed.
Manual build
You can build things for yourself by following our Manual build howto and by choosing from the configurations available below.
U-Boot
Sunxi/Legacy U-Boot
Use the MANUFACTURER_DEVICE build target.
Mainline U-Boot
Use the MANUFACTURER_DEVICE build target.
Linux Kernel
Sunxi/Legacy Kernel
Use the MANUFACTURER_DEVICE.fex file.
Mainline kernel
Use the FAMILY-CHIP-DEVICE.dtb device-tree binary.
Tips, Tricks, Caveats
Add MANUFACTURER DEVICE specific tips, tricks, Caveats and nice to have changes here.
FEL mode
The something button triggers FEL mode.
Device specific topic
The board can also be used unpowered as a dual USB controller by using a male-to-male USB cable attached to the topmost USB port. It shows up in Linux with the USB device id 17c0:06e1.
When plugged in an USB male connector (and there is no other supply of voltage) the LEDs D47, D9, D46, D45 and D3 light up, as pictured
Plugging an USB cable connected to a PC in the bottom port apparently does nothing. It might be used to add external inputs to the powered on board but I have not been able to test that.
When powered up, only the LEDs D3 and D45 light up, followed by D4 in a matter of a second.
...
Adding a serial port (voids warranty)
Still to be confirmed.
Device disassembly
Unscrew three phillips screws and you're in. :-D
Locating the UART
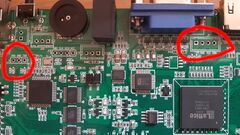
I found two candidates for the UART port, the most likely being the one beneath the VGA and HDMI port. Still waiting for a USB to Serial adaptor to find out for sure.
Here's a link to the UART howto.
Pictures
See also
Add some nice to have links here. This includes related devices, and external links.


