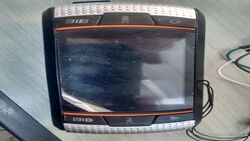
SZCHY DVRA1R170
| SZCHY DVRA1R170 | |
|---|---|
 | |
| Manufacturer | unknown original |
| Dimensions | 120mm x 35mm x 45mm |
| Release Date | Template:27/3/2014 on PCB |
| Website | Polarlander A1 one reseller |
| Specifications | |
| SoC | A20 @ XGhz |
| DRAM | 128MiB DDR3 @ xxxMHz |
| NAND | not present |
| Power | DC 5V on USB mini, ???mAh 3.7V Li-Ion battery |
| Features | |
| LCD | 58mmx35mm (2.7" 16:9) |
| Video | HDMI (Type B - mini), VGA |
| Audio | HDMI, internal speaker, internal microphone |
| Network | nothing standalone; maybe USB gadget on mainline? |
| Storage | µSD |
| USB | 1 USB2.0 OTG |
| Camera | ??.?MP (????x????) front, composite in as rear |
| Other | Accelerometer (Manufacturer device), GPS, IRDA |
| Headers | UART, HDMI, CSI, LCD, ... |
This page needs to be properly filled according to the New Device Howto and the New Device Page guide.
If a device is special, then feel free to provide a terse description of what makes this device so special. But terse, no novels, no marketing blurb.
Identification
On my exemplar there were no external marks of a brand or model!
The PCB has the following silkscreened on it:
DS_DVR_A10_A1_V2.1 TEAN 3215
2014/03/27
Then, below, a label was saying
A1-A20V-V2.1
2010335
SMD15.12.26
maybe this design started with an Allwinner A10, and then it was ported to A20 (as it's pin to pin compatible!
In android, under Settings->About Tablet, you will find:
- Model Number: DEVICE
- Build Number: SOC_BOARD_DEVICE_*.*
Sunxi support
Current status
A pretty stock image of for an A20 based device, can boot from the microSD and work on console. what's seen on dmesg and tested:
- the microSD is seen, and tested on read/write
- the HDMI is seen by the 4.15 DRM but still not tested. looking for the proper cable.
Trying to recover the fex to enable the internal LCD and camera and other peripherals
Manual build
You can build things for yourself by following our Manual build howto and by choosing from the configurations available below.
U-Boot
Sunxi/Legacy U-Boot
This is the log of the provided ROM at boot over console:
HELLO! BOOT0 is starting!
DRAM boot version v1.17
DRAM space auto detect
DRAM space auto scan succceed!
para->dram_rank_num = 1
para->dram_io_width = 16
para->dram_bus_width = 16
para->dram_chip_density = 8192 Mb
row number is 13
dram size =128
Succeed in reading uboothead.
The size of uboot is 0x0006c000.
Jump to secend Boot.
[      0.203]

U-Boot 2011.09-rc1-00002-g2951019-dirty (Jun 18 2015 - 13:44:10) Allwinner Technology

[      0.321]PMU: AXP209
find power_sply to end
no key input
[      0.348]DRAM:  128 MiB
[      0.408]lcd0_para.lcd_used=1
lcd_panel_fun[0].cfg_open_flow is NULL
spinor is initing...OK
In:    serial
Out:   serial
Err:   serial
setjmp success!Use decode 2x2 sampling
Input file size: 262144
[      0.509]Hit any key to stop autoboot:  0
[      1.290]sunxi flash read :offset 4000, 3637248 bytes OK
[      1.297]
Starting kernel ...
Mainline U-Boot
Use the MANUFACTURER_DEVICE build target.
Linux Kernel
Sunxi/Legacy Kernel
Use the MANUFACTURER_DEVICE.fex file.
Mainline kernel
Use the FAMILY-CHIP-DEVICE.dtb device-tree binary.
Tips, Tricks, Caveats
Add MANUFACTURER DEVICE specific tips, tricks, Caveats and nice to have changes here.
FEL mode
I've been able to get to fel mode, with the serial console, pressing 2 at power up:
2222222222HELLO! BOOT0 is starting!
DRAM boot version v1.17
DRAM space auto detect
DRAM space auto scan succceed!
para->dram_rank_num = 1
para->dram_io_width = 16
para->dram_bus_width = 16
para->dram_chip_density = 8192 Mb
row number is 13
dram size =128
Succeed in reading uboothead.
The size of uboot is 0x0006c000.
Jump to secend Boot.
[      0.203]

U-Boot 2011.09-rc1-00002-g2951019-dirty (Jun 18 2015 - 13:44:10) Allwinner Technology

[      0.321]PMU: AXP209
find power_sply to end
0x32
set next system status
reset cpu
HELLO! BOOT0 is starting!
eraly jump fel
The something button triggers FEL mode.
Device specific topic
If there are no further device specific topics to add, remove these sections.
...
Adding a serial port (voids warranty)
on the back of the PCB there are the PADS for the console UART. used small rework wires. tested working.
Device disassembly
There are 4 screws behind the silver brackets, then you can pry open with a flat scredriver in the minijack,
Locating the UART
The pads are clearly marked on the back of the PCB; see image below. use wirewraps for electronic reworks. tested working
Pictures
Also known as
There are a number of Vendor of this China Dashcam:
See also
Add some nice to have links here. This includes related devices, and external links.
Manufacturer images
Optional. Add non-sunxi images in this section.


