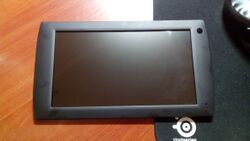
Prestigio PMP3270B
| Prestigio PMP3270B | |
|---|---|
 | |
| Manufacturer | Manufacturer |
| Dimensions | 197 x 113 x 10.5mm |
| Release Date | August 2012 |
| Website | Device Product Page |
| Specifications | |
| SoC | A13 @ 1Ghz |
| DRAM | 512MiB DDR3 @ 408MHz |
| NAND | 4GB |
| Power | DC 5V @ 2A, 2500mAh 3.7V Li-Ion battery |
| Features | |
| LCD | 800x480 (7" 16:9) |
| Touchscreen | 2-finger capacitive (Manufacturer device FIXME) |
| Audio | 3.5mm headphone plug, internal speaker, internal microphone |
| Network | WiFi 802.11 b/g/n (Realtek RTL8188CUS) |
| Storage | µSD |
| USB | 1 USB2.0 OTG |
| Camera | 0.3MP (640x480) front |
| Other | Accelerometer (Bosch BMA250), RTC (PCF8563) |
This page needs to be properly filled according to the New Device Howto and the New Device Page guide.
Identification
On the back of the device, the following is printed:
PRESTIGIO MULTIPAD
Tablet PC | PMP3270B
The PCB has the following silkscreened on it:
ME12
2012-06-21
In android, under Settings->About Tablet, you will find:
- Model Number: PMP3270B
- Build Number: PMP3270B_V1.0.12-eng 4.0.3 IML74K 20130313 test-keys
Sunxi support
Current status
Awaiting patches.
Images
HW-Pack
BSP
Manual build
- For building u-boot, use the prestigio_pmp3270 target.
- The .fex file can be found in sunxi-boards as prestigio_pmp3270.fex
Everything else is the same as the manual build howto.
FEL mode
The Vol+ button triggers FEL mode.
Adding a serial port (voids warranty)
Device disassembly
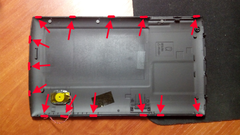
There are two screws on the connector side which have to be removed first. Then carefully insert your Plastic tool between front and back case and pop all the clips. Clips are located on the back case and should be pushed inside. Exact location of each clip is shown on the picture.
Locating the UART
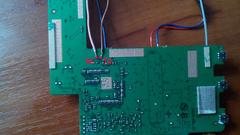
UART pads are located near the board edge with battery pads under main chip. Solder on some wires according to our UART Howto
Pictures
Take some pictures of your device, upload them, and add them here. DO NOT UPLOAD PICTURES WHICH YOU PLUCKED OFF THE INTERNET.
Also known as
MultiPad 7.0 PRIME


