Monkon new arrival mt2
| Monkon new arrival mt2 | |
|---|---|
 | |
| Manufacturer | Unidentified Manufacturer |
| Dimensions | widthmm x breadthmm x heightmm |
| Release Date | September 2014 (At least) |
| Website | Missing Device Product Page |
| Specifications | |
| SoC | A20 @ 1Ghz |
| DRAM | 1GiB DDR3 @ xxxMHz (Hynix h5tq1g63dfr) |
| Power | USB, 400mAh 3.3V Li-Ion battery |
| Features | |
| LCD | WidthxHeight (2.7" X:Y) |
| Video | HDMI (Type B - mini), AV connector |
| Audio | HDMI, internal speaker, internal microphone, AV connector |
| Storage | µSD, 8MiB SPI Flash (Macronix MX 25L6406E M2I-126) |
| USB | 1 USB2.0 OTG |
| Camera | 2MP (1920x1080) front (separate module) |
| Other | 6 LEDs attached to camera module. |
| Headers | UART |
This page needs to be properly filled according to the New Device Howto and the New Device Page guide.
The Monkon New Arrival MT2 is an A20 based "DashCam" (Dashboard camera), which does not even run linux or android from its 8MiB SPI ROM. It is very cheap and very bad for what it is supposed to do, and the reviews on amazon.co.uk are terrible.
Identification
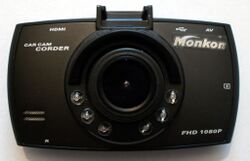
On the camera side of the device, the following is printed:
CAR CAM CORDER
and
FHD 1080p
The Monkon badge was crudely glued on the back of the Monkon rebadged device.
The back of the mainboard has the following silkscreened on it:
TF101_JQ537_MAIN V1.4
2014-09-30
Sunxi support
Current status
Not supported.
Since this hardware is not using a linux or an android, it remains to be seen what can be retrieved from the SPI rom. There is a good chance that support will have to be created from scratch.
Manual build
You can build things for yourself by following our Manual build howto and by choosing from the configurations available below.
U-Boot
Sunxi/Legacy U-Boot
Use the MANUFACTURER_DEVICE build target.
Mainline U-Boot
Use the MANUFACTURER_DEVICE build target.
Linux Kernel
Sunxi/Legacy Kernel
Use the MANUFACTURER_DEVICE.fexfile.
Mainline kernel
Use the FAMILY-CHIP-DEVICE.dtb device-tree binary.
Tips, Tricks, Caveats
FEL mode
The something button triggers FEL mode.
Adding a serial port (voids warranty)
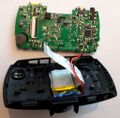
Device disassembly
Remove the 4 tiny screws, and then you can carefully remove the front bezel with your Plastic tool.
Start from the top edge (the side without the buttons). This side needs to be moved in, as there are two clips which need to be pushed inwards, and which then easily release from the rest of the housing. The two sides can then be pushed outwards from the main housing, so the clips there release. Rotate the bezel slightly, and the most fragile clip at the bottom of the bezel should give way.
Dismantling the rest of the device should now be straightforward.
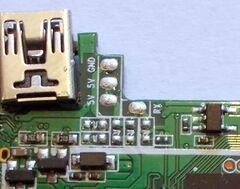
Locating the UART
There are 4 pads north of the DRAM module, which are marked: GND, 5V, 5V and RX. The TX is probably one of the 5V lines. Just solder on some wires according to our UART howto.
So far, no UART output has been detected.
Pictures
Also known as
The Monkon is clearly a cheap rebadge job, and will have been sold under a few different guises, and can still easily be found on aliexpress.


