Intenso TAB744
| Intenso TAB744 | |
|---|---|
| Manufacturer | intenso.de |
| Dimensions | 191 x 90 x 122 mm |
| Release Date | September 2014 |
| Website | Official TAB744 Datasheet Original Kitkat Firmware |
| Specifications | |
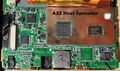
| SoC | A33 Quad Core @ 1.3Ghz with Mali-400MP2 |
| DRAM | 1024MiB DDR3 |
| NAND | 8GB |
| Power | DC 5V⎓2A 3.7V Li-Po battery |
| Features | |
| LCD | 7" IPS edge-lit panel, 1024x600 px, 154x91 mm (KR070LF7T, 165x100 mm) |
| Touchscreen | 5-finger capacitive (Focaltech FT5302, datasheet) |
| Video | none |
| Audio | 3.5mm headphone plug, internal speaker, internal microphone |
| Network | WiFi 802.11 b/g/n (Realtek RTL8188EU@usb:0bda:8179, datasheet) no bluetooth |
| Storage | µSD |
| USB | 1x USB2.0 OTG |
| Camera | 0.3MP front camera, 640x480 px (Galaxycore GC0329, datasheet) no rear camera |
| Other | Accelerometer (Freescale MMA865x, [1] or [2]) |
| Headers | none |
This page needs to be properly filled according to the New Device Howto and the New Device Page guide.
Identification
On the back of the device, the following is printed:
TAB744
|
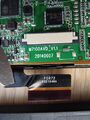
Inside the device, below the capacitive touch panel (ctp) connector, imprinted on the PCB, it reads:
|
![]() Note: There are firmwares for the M7100AVD board labeled wifi+bt, but to best knowledge the TAB744 has never been sold with bluetooth support. Pre- or successors pcb names are M7100ALD, M7300AVD, but they have different specs.
Note: There are firmwares for the M7100AVD board labeled wifi+bt, but to best knowledge the TAB744 has never been sold with bluetooth support. Pre- or successors pcb names are M7100ALD, M7300AVD, but they have different specs.
Tips, Tricks, Caveats
Recovery mode
- Power off the device
- Hold down the vol+ button
- Power on the device
- Release the vol+ button when recovery starts
If it does not work, retry the same, but with vol- button.
FEL (flash/upgrade mode)
See LiveSuit and Sunxi-tools for tools to flash, download or upgrade firmware on TAB744.
- switch the device off (press power button longer than 10 s)
- enter FEL mode by holding Vol+ button while connecting USB cable to PC
- then repeatedly press power button while still holding Vol+ button
If you are using LiveSuit, you need to start and select firmware first, before connecting the device. To troubleshoot the process you can check if you've entered flash mode using e.g. lsusb:
- FEL mode check
# lsusb
Bus 003 Device 018: ID 1f3a:efe8 Onda (unverified) V972 tablet in flashing mode
If you get ID 1f3a:1000 Onda (unverified) instead, then tablet is not in flashing mode;
the kernel will then attach scsi generic driver with output in 'dmesg' like this:
# [12514.909226] scsi host27: usb-storage 3-1:1.0
# [12515.909172] scsi 27:0:0:0: Direct-Access              TAB744           0100 PQ: 0 ANSI: 2
# [12515.909332] scsi 27:0:0:1: Direct-Access              TAB744           0100 PQ: 0 ANSI: 2
# [12515.909796] sd 27:0:0:0: Attached scsi generic sg6 type 0
# [12515.914209] sd 27:0:0:1: Attached scsi generic sg7 type 0
# [12515.914385] sd 27:0:0:1: [sdg] Attached SCSI removable disk
# [12515.917020] sd 27:0:0:0: [sdf] Attached SCSI removable disk
- FEL version example
$ ./sunxi-fel version
AWUSBFEX soc=00001667(A33) 00000001 ver=0001 44 08 scratchpad=00007e00 00000000 00000000
ADB (remote debug mode)
This device does not have root access enabled by default. If USB debugging is enabled in settings on the tablet, run
echo -e '0x1f3a\n0x1002' >> .android/adb_usb.ini
sudo bash -c 'echo SUBSYSTEM==\"usb\", ATTR{idVendor}==\"1f3a\", ATTRS{idProduct}==\"1002\", MODE=\"0666\", \
  GROUP=\"plugdev\", SYMLINK+=\"android%n\" >> /etc/udev/rules.d/51-android.rules'
udevadm control --reload-rules
for android debug bridge to work:
adb devices
adb shell
..
- change build.prop
You can change build.prop after having flashed the firmware.
adb shell
remount -o remount,rw /system
busybox vi /system/build.prop # use :wq to write and quit
sync
remount -o remount,ro /system
Modify firmware
You can unpack, modify and repack firmware images before flashing them.
This way build.prop may also be changed before flashing the firmware.
/prep.sh automates the steps explained and outlined below all-in-one.
- system.fex
The steps to modify files within system partition are roughly:
imgrepacker kk.img
cd kk.img.dump
  simg2img system.fex system.bin
  mkdir sys
  sudo mount -o loop system.bin sys
    sudo vim sys/build.prop # or other files
    # copy/rm files within sys as necessary
  sudo umount sys
  ext2simg system.bin system.fex
  FileAddSum system.fex Vsystem.fex
cd ..
imgrepacker kk.img.dump
- boot.fex
To modify boot.fex that contains kernel zImage and cpio ramdisk:
# for *bootimg, *ramdisk tools see e.g. xda-developers.com
imgrepacker kk.img
cd kk.img.dump
  umkbootimg boot.fex
  unpack_ramdisk initramfs.cpio.gz
  #edit files in ramdisk/, see e.g. sun8i.rc files for modules loaded during init
  repack_ramdisk ramdisk/
  mkbootimg --kernel zImage --ramdisk new-ramdisk.cpio.gz --base 0x40000000 -o boot.fex
  rm -rf zImage *.cpio.gz ramdisk/
  FileAddSum boot.fex Vboot.fex
cd ..
imgrepacker kk.img.dump
- sys_config.fex
You can read up on the device gpio settings using a sys_config.fex extract from the stock rom.
This file contains an ascii-pendant to script.bin (a.k.a. config.fex or sys_config.bin). It can be thought of as an alternative to a device tree specification used in the mainline linux kernel and newer versions of u-boot. If you want to change it, keep in mind to update its binary representation and files that incorporate it afterwards:
# clone pctools/linux/mod_update (alternative), sunxi-tools for tools
imgrepacker kk.img
cd kk.img.dump
  f=sys_config.fex  b=${f/.fex/.bin}
  ../mod_update/script $f  # fex2bin $f $b
  ../mod_update/update_boot0 boot0_sdcard.fex $b SDMMC_CARD
  ../mod_update/update_boot0 boot0_nand.fex $b NAND
  ../mod_update/update_fes1 fes1.fex $b
  ../mod_update/update_uboot u-boot.fex $b  # troublesome, see note below
  mv $b config.fex
cd ..
imgrepacker kk.img.dump
![]() Note: If you get memory corruption trying to run
Note: If you get memory corruption trying to run update_uboot you need to build a patched update_uboot.
- u-boot.fex
A problematic firmware, e.g. black screen, may be fixed by simply overwriting it with u-boot.fex from another, working firmware. There is no Vu-boot.fex checksum in the firmware file, so you can simply replace it. u-boot.fex contains a copy of script.bin at its end. Extracting it may aid in debugging.
To reverse extract the script.bin in u-boot.fex and convert it to a human readable sys_config.fex use
dd if=u-boot.fex bs=1c skip=$(od -A n --skip-bytes=24 --read-bytes=4 -i u-boot.fex | tr -d ' ') \
| od -A n -x --endian=big -w65536 | xxd -r -p | ../sunxi-tools/bin2fex - u-boot_sys_config.fex
You can then verify if the u-boot.fex included version of script.bin actually matches sys_config.fex shipped with the firmware.
diff -u u-boot_sys_config.fex \
  <(../sunxi-tools/fex2bin sys_config.fex /dev/stdout | ../sunxi-tools/bin2fex - /dev/stdout)
![]() Note: To update u-boot.fex always use
Note: To update u-boot.fex always use update_uboot. There are some settings within the pure u-boot.bin that are updated in addition to appending the script.bin file.
- Vdiskfs.fex
The presence of this file in a firmware sometimes prevents flashing it with LiveSuit. This can be fixed by
# clone pctools/linux/mod_update (alternative), sunxi-tools for tools
imgrepacker kk.img
cd kk.img.dump
  rm Vdiskfs.fex
  for f in image.cfg _img.files/Filelist.txt
  do sed -i -e '/Vdiskfs.fex/d' $f
  done

  f=sys_partition.fex  b=${f/.fex/.bin}
  sed -i -e '/diskfs.fex/,$ s/;\(verify *= *0\)/\1/' $f
  unix2dos $f
  ../mod_update/script $f  # fex2bin $f $b
  ../mod_update/update_mbr $b 4

  # eventually overwrite u-boot.fex with known-to-work copy, see #u-boot.fex
  #cp ../u-boot.fex u-boot.fex
cd ..
imgrepacker kk.img.dump

mv kk.img     kk-mod_$(date +%Y%m%dT%H%M).img
mv kk.img.bak kk.img
rm -rf kk.img.dump
Fixing touchscreen issues
![]() Note: To try out unofficial or foreign firmware, remove
Note: To try out unofficial or foreign firmware, remove
ft5x_ts.koands_wmt_ts_ft5x0x.ko, etc. from #system.fex- deactivate entries such as
wmt.io.ts.upg=..,ctp_upgrade_used=1,ctp_firm=1, etc. from #sys_config.fex before flashing. Some of these modules may write improper data to the EEPROM of FT5302 in TAB744 during bootup.
- touchpanel calibration -> tp.idc, ft5x0x_ts.idc
Calibration issues in android are fixable by adjusting files /usr/idc/tp.idc or /usr/idc/ft5x0x_ts.idc (example1, example2).
- touchpanel service manuals
Although written in chinese language, A20 CTP v2.0 service manual (dir link) may aid in debugging ctp related problems. In particular see pages 28, 29 and forth, they speak about rmmod/insmod ft5x_ts.ko and putting it in debug mode as well as using getevent to see lowlevel touch events from the ctp controller. There are also references to the driver source code and setting up sys_config.fex.
Dump firmware from NAND
Using FEL or FES modes, you can dump the NAND to PC for backup and reference purposes. There is a convenience tool called FELix. Its written in Ruby, supports a listing of available partitions in nand by name and many more.
First make sure, LiveSuit is not running. Open up a shell, attach the tablet in FEL mode, double check the device id 01f3a:efe8 with lsusb.
If fes1.fex is not found in the top level directory inside firmware images, the extractor employed by FELix will fail. For this reason FES#Boot_2.0 method is used here instead with which you extract fes1.fex and u-boot.fex manually from available A33 firmwares.
./sunxi-fel write 0x2000 fes1.fex  # DDR-RAM in FEL mode was inaccessible without this,
./sunxi-fel exe   0x2000           # need fes1.fex to explicitly enable MMU on A33
  # following dumps need trimming at end if they are to be used as u-boot.fex and config.fex
  ./sunxi-fel read 0x43000000 0x10000 tab_script.bin      # read script.bin copied from device NAND to RAM on boot
  #./sunxi-fel read 0x49000000 0xb8000 tab_u-boot.bin      # reading u-boot.bin is possible from two addresses in RAM, but
  #./sunxi-fel read 0x4a000000 0xb8000 tab_u-boot.bin      # may differ at read time from that stored in device flash (?)
  #./sunxi-fel read 0x40000000 0x40000000 tab_ramdump.bin  # read full 1GB if above do not work (takes long @~500kb/s)
./sunxi-fel write 0x4a000000 u-boot.fex
./sunxi-fel fill  0x4a0000e0 1 0x10
./sunxi-fel exe   0x4a000000       # should be in FES mode now
Now find the device id using lsusb and unbind the driver from the usb port.
3-1:1.0 is an example and may vary. FELix uses libusb and drives the port itself.
echo 3-1:1.0 > /sys/bus/usb/drivers/allwinner/unbind
# we've already entered FES using sunxi-fel above
#ruby felix --tofes a33-firmware.img

# enable read and write access to the nand flash
ruby felix --nand on

# get a partition list
ruby felix --mbr-dump

# get first 16MB of nand and extract sunxi_mbr.fex
ruby felix -c fes --read tab_mbr.bin -a 0x0 -l $((0x8000*0x200))
dd if=tab_mbr.bin of=tab_sunxi_mbr.fex count=$((0x80))

# extract partitions (more info on bootloader backup)
for part in bootloader env boot system data misc recovery cache metadata private
do ruby felix -c fes --read tab_$part.bin -t none -i $part ; sleep 2
done

# optionally extract user disk (last partition; should fill rest of nand flash mem)
# the mbr-dump above shows the address needed, length is 8G in this case minus address * sector size
ruby felix -c fes --read tab_UDISK.bin --address 0x4d0000 --length $((0x200000000 - 0x4d0000*0x200))
The extracted binaries can now be further processed using the tools introduced and outlined in #Modify firmware above to build a semi-official stock rom, flashable by LiveSuit and a number of other tools.
To not share any personal data, consider doing a factory reset of the tab beforehand or using an unused one. Since data partition(s) will not be part of the resulting firmware and /system is typically not writeable to by tab users, this might not be strictly necessary.
The steps above have been tested more than once and should work reliably. Info about how to easily extract u-boot.fex from a stock device is still a TODO:
- INM7102AVD uses a different u-boot.bin than M7100AVD by size, but not by version string. Using the one from the later and updating it with the correct /sys_config.fex is known to work.
- Using the RAM extracted u-boot.fex(s) advocated above is troublesome. LiveSuit will not get a reply from the device after pushing these to enter FES mode. However, this is not crucial, as same-versioned u-boot.fex from M7100AVD firmware works as a drop-in replacement.
Device disassembly (voids warranty)
The back cover uses snap-ins, but sits very tight on the front frame. Where the volume and power buttons sit, the plastic is so thin that it's very likely to break, when trying to remove the back cover. To start opening, be sure to pick a spot about one mm below the display at a place where no buttons or connection holes are situated. Remember that you will loose warranty doing this with most vendors.
- the lcd connector opens by rotating in a hinge knee, pull the black part up (long side)
- the touchscreen cable connector aside the FT5302 has a slider, you push the black part horizontally, ideally by getting a nail or some tool between the white and black part on both short sides, using levers synchronously
Adding a serial port
Howto needed: Does the N7 Pro serial port guide to add a serial port work for this device too!?
Pictures
Focaltech FT5302 (FT5302FE4 ERH212C) ctp controller
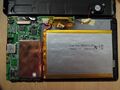
Greatpower 3000mAh 3.7V Li-Po battery
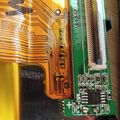
KR070LF7T 7inch IPS LCD connector
Realtek RTL8188ETV wifi chip


