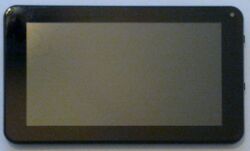
Inet k70hc
| Inet k70hc | |
|---|---|
 | |
| Manufacturer | Inet |
| Dimensions | 181mm x 110mm x 9mm |
| Release Date | May 2013 |
| Website | K70HC product page |
| Specifications | |
| SoC | A20 @ 1.2Ghz |
| DRAM | 1GiB DDR3 @ 384MHz |
| NAND | 8GB |
| Power | USB charging only, 3200mAh ?V Li-Ion battery |
| Features | |
| LCD | 1024x600 (7" TN) |
| Touchscreen | 5-finger capacitive (Silead GSL1680) |
| Video | HDMI (Type C - mini) |
| Audio | 3.5mm headphone plug, HDMI, internal speaker, internal microphone |
| Network | WiFi 802.11 b/g/n (Realtek RTL8188ETV) |
| Storage | µSD |
| USB | 1 USB2.0 OTG |
| Camera | 0.3MP (640x480) front, 2MP (1600x1200) rear (optional) |
| Other | Accelerometer (TODO: Manufacturer device), Bluetooth, reset button |
| Headers | UART |
Identification
In android, under Settings->About Tablet, you will find...
For the Leliktec rebadge:
- Model Number: K701HC
- Build Number: A20_K70_K701HC_*.*
For the W-Tech rebadge:
- Model Number: BW-0708
- Build Number: A20_K70_K701C.* W-Tech S/N *
Sunxi support
Current status
Working.
The USB OTG port totally refuses to work. This needs to be properly debugged still, perhaps this is an issue of our kernel on A20, perhaps this is just this tablets config.
Images
HW-Pack
BSP
Manual build
- For building u-boot, use the "INet_K70HC" target.
- The .fex file can be found in sunxi-boards as inet_k70hc.fex
Everything else is the same as the manual build howto.
Tips, Tricks, Caveats
FEL mode
The back button triggers FEL mode.
USB OTG port
This device comes with only a single USB port, and has no separate power connector. It therefor is only of limited use as a standalone desktop style device, as connecting a keyboard and/or mouse will only work as long as the battery lasts.
Adding a serial port
Device disassembly
Remove the two screws on the side with the connectors.
Now gently insert your plastic tool in the space between the connector face and the back. All of the clip hooks are on the back plate, so you need to gently force the edge of the back plate inwards, while the edge of the front side of the device needs to be gently forced out. You should soon hear the plastic clips popping. Be careful when removing the back, as the speaker is lightly glued to it.
Locating the UART
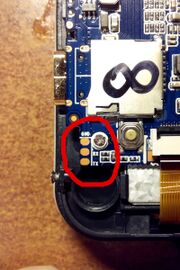
There are nice pads labelled "GND", "RX" and "TX" below the SD card. All you have to do is solder on some wires.
Pictures
Also known as
- LélikTec Avalon 7HD (single camera)
- Perfeo 7510-HD (dual camera, Kingston DDR3 chips running @ 408 MHz)
- CCE Motion Hold TR72 (dual camera)
- It also seems to be sold by the "Cash & Carry" group in Mauritius where it carries "W-Tech" on the back.


