HYH-TBH3
| HYH-TBH3 | |
|---|---|
 | |
| Manufacturer | Manufacturer |
| Dimensions | width 90 mm x breadth 90 mm x height18 mm |
| Release Date | March 2015 |
| Website | Device Product Page |
| Specifications | |
| SoC | H3 @ 1.5 GHz |
| DRAM | 1 GiB DDR3 @ 672 MHz (H5TQ4G63AFR-PBC) |
| NAND | 8 GB (H27UCG8T2ETR-BC) |
| Power | DC 5 V @ 2 A (4.0 mm/1.7 mm barrel plug - centre positive) |
| Features | |
| Video | HDMI (Type A - full), CVBS 3.5 mm 4 pole plug |
| Audio | 3.5 mm 4 pole (combined A/V) plug, HDMI, SPDIF |
| Network | WiFi 802.11 b/g/n, Bluetooth (Realtek RTL8723AS), 10/100 Mb/s Ethernet |
| Storage | µSD |
| USB | 2 X USB 2.0 Host |
| Camera | optional (GC2035, 1600x1200) |
| Headers | UART, CSI |
This page needs to be properly filled according to the New Device Howto and the New Device Page guide.
If a device is special, then feel free to provide a terse description of what makes this device so special. But terse, no novels, no marketing blurb.
Identification
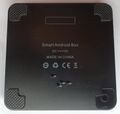
On the back of the device, the following is printed:
Smart Android Box
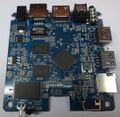
The PCB has the following silkscreened on it:
W-SF
20141206-H3-V1.0
2015-01-15
In android, under Settings->About Tablet, you will find:
- Model Number: zhx
- Build Number: dolphin_fvd_p1-eng 4.4.2 KOT49H 20150323 test-keys
Sunxi support
Current status
Unsupported.
However, as of this writing, the sun8i-h3-orangepi-pc target is generic enough to be safely usable with this device.
Since this is not a developer device, things like missing mainline H3 support for ethernet, HDMI/Composite out and only one active USB port does limit its current usefulness.
Images
Add MANUFACTURER DEVICE specific sunxi ROM images here. E.g. a livesuit image or some other linux image which uses linux-sunxi code. Do not put non-sunxi images here, they should live under See also. If no sunxi based images are available, this section can be left blank.
HW-Pack
Add MANUFACTURER DEVICE HW-pack specifics here. This section can be left blank.
BSP
Add MANUFACTURER DEVICE BSP specifics here. This section can be left blank.
Manual build
- For building U-Boot, use the MANUFACTURER_DEVICE target.
- The .fex file can be found in sunxi-boards as hyh-tbh3.fex
Everything else is the same as the manual build howto.
Mainline U-Boot
If there is mainline U-Boot support, add this section.
For building mainline U-Boot, use the MANUFACTURER_DEVICE target.
Don't forget to add[[Category:Mainline_U-Boot]]at the bottom of the page.
Mainline kernel
If there is mainline kernel support, add this section.
Use the FAMILY-CHIP-DEVICE.dtb device-tree file for the mainline kernel.
Don't forget to add[[Category:Mainline_Kernel]]at the bottom of the page.
Tips, Tricks, Caveats
Add MANUFACTURER DEVICE specific tips, tricks, Caveats and nice to have changes here.
FEL mode
Make sure that your device is truly powered off. Do not leave any cables attached. Attach The UART cable and launch your serial console. Now in the same time you attach the Power cable and you send the character '2' to the device during power-up. When in fel mode you should see eraly jump fel on screen. Now you can attach a USB-cable to the USB port near the micro SD slot.
To verify you have successfully entered FEL mode, check the output of sunxi-fel version. For the Hyh-tbh3, it should look like:
AWUSBFEX soc=00001680(H3) 00000001 ver=0001 44 08 scratchpad=00007e00 00000000 00000000
DRAM clock speed limit
DRAM is clocked at 672 MHz by the hardware vendor. But the reliability still needs to be verified. One of the ways of doing reliability tests may be https://github.com/ssvb/lima-memtester/releases/tag/20151207-orange-pi-pc-fel-test (it checks the Orange Pi PC DRAM setup in the current mainline U-Boot v2016.01-rc2 + a bugfix).
NOTE: While this test image was made for the Orange Pi PC, it also runs on the Orange Pi Plus.
| Hardware | Diagnostic software | lima-memtester passes (survives until the red LED) | lima-memtester fails | Notes |
|---|---|---|---|---|
| User:von fritz's Hyh-tbh3 | fel-boot-lima-memtester-on-orange-pi-pc-v3.tar.gz with hyh-tbh3.bin and max_freq = 1200000000 | 768 MHz | 792 MHz | no Heatsink. Up to 768 MHz passed until Loop 15 tested, 792 MHz fails with libusb usb_bulk_send error -9. |
See the Orange Pi PC DRAM clock speed limit for how to perform an analysis of these results.
...
Adding a serial port (voids warranty)
Device disassembly
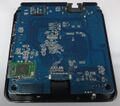
Remove the four rubber feet on the bottom and unscrew the four micro screws, see Device_picture
Locating the UART
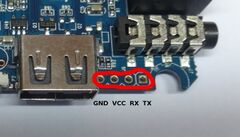
UART pads are located between the USB port and the A/V CVBS output jack UART howto.
Pictures
Also known as
Toosin vmade OEM H3
Xgody AT-756D
CN_H3
TVPP0030 (no SPDIF)
TVPP0042
See also
Manufacturer images
Optional. Add non-sunxi images in this section.
