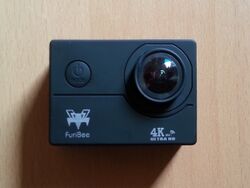
F60 Action Camera
| F60 Action Camera | |
|---|---|
 | |
| Manufacturer | Various |
| Dimensions | 60mm x 42mm x 26mm |
| Release Date | October 2013 |
| Website | Device Product Page |
| Specifications | |
| SoC | V3 @ 1Ghz |
| DRAM | 128MiB DDR3 @ 648MHz |
| SPI NOR | 8MiB |
| Power | 900mAh 3.7V Li-Ion battery, USB |
| Features | |
| LCD | 320x240 (2" 4:3, ST7789V) |
| Video | HDMI (Type D - micro, EP952 encoder) |
| Audio | internal speaker, internal microphone |
| Network | WiFi 802.11 b/g/n (Allwinner XR819) |
| Storage | µSD |
| USB | 1 USB2.0 OTG |
| Camera | 8.0MP (3280x2460, IMX179) |
| Headers | UART |
The F60 Action Camera is a V3-based device that ships with a 3.4 Allwinner downstream modified Linux kernel with a standalone camera interface called camdroid.
Identification
This device is often marketed as a V3 4K Action Camera.
The PCB has the following silkscreen marking:
SL631_MAIN_V2.3
2017-10-19
Sunxi support
Current status
There is currently no source code available for the device in Linux and U-Boot (either upstream or downstream modified versions), thus no support is available.
The source code from this somewhat similar board may be useful [1]. Otherwise, it may be useful to search for the Allwinner platform number (sun8iw8p1 ?) and uboot.
Tips, Tricks, Caveats
ADB access
ADB can be obtained by connecting the device via USB and selecting Charging Mode on it. ADB gives access to a root shell.
FEL mode
The boot software appears to hold when a button is pushed during boot, which is perhaps a way to trigger FEL mode. More investigation is required on that aspect.
Adding a serial port (voids warranty)
Device disassembly
The first step to open the device is to remove the clipped front cover in order to access four screws that need to be removed before the device can be taken out of its case. Removing the device from its case completely requires disconnecting the LCD panel cable. Since the panel is held on the other side of the device, this can be tricky. An easy way to disconnect the panel consists in removing the glued glass protection from the other side of the device (the panel is not glued to it, only the case on the side is) and lifting the LCD panel. It can then be disconnected properly.
Locating the UART
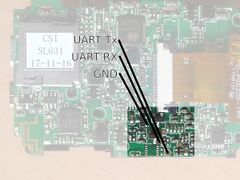
The UART of the V3 SoC is exposed with two pads on the bottom side of the PCB. They are located close to the LCD panel connector, as indicated in the associated picture. Wires can be soldered to these pads and connected according to the UART howto.
Pictures
Also known as
- Furibee F60 Action Camera


