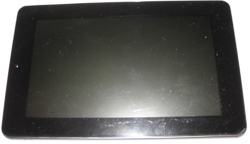
Empire ElectroniX M712
| Empire ElectroniX M712 | |
|---|---|
 | |
| Manufacturer | Empire ElectroniX [1] |
| Dimensions | 193mm x 120mm x 7mm |
| Release Date | September 2012 |
| Website | unknown |
| Specifications | |
| SoC | A13 @ 1.2Ghz |
| DRAM | 512MiB DDR3 @ 408MHz |
| NAND | 4GB |
| Power | DC 5V @ 1.5A, 2500mAh 3.7V Li-Ion battery |
| Features | |
| LCD | 7", 800 x 480, 16:9 |
| Touchscreen | 5-finger capacitive (KR070PE4T), Controler: GOODIX GT811 |
| Video | None |
| Audio | 3.5mm headphone plug, internal speaker, internal microphone |
| Network | WiFi 802.11 b/g/n (REALTEK RTL8188EUS) |
| Storage | µSD (up to 32GB) |
| USB | 1x mini USB2.0 (Host or OTG) |
| Camera | 0.3MP (640x480) front |
| Other | Accelerometer (±2g tri-axial digital accelerometer DMT ARD06) |
| Headers | UART, JTAG, LCD, VGA, ... |
Identification
On the back of the device, the following is printed:
Empire ElectroniX
S/N:EMPR20147124GB000087
The PCB has the following silkscreened on it:
XW712-V1.2
2012-8-8
QL20 12.43
In android, under Settings->About Tablet, you will find:
- Model Number: Compatible-A13-eng- 4.2.2 JDQ39 by Toxicro
- Build Number:
This is not useful information and may not be the original string of the tablet. The device was identified by searching the internet and finding the manual.
Sunxi support
Current status
Supported: Boot from SD card, Touchscreen, Audio, WiFi, USB, Ethernet over USB-Adapter
Both mainline and sunxi U-Boot work. There is no mainline kernel support but sunxi-3.4 kernel properly supports the device with Debian LXDE root file system.
Not tested so far: accelerometer, camera
Images
HW-Pack
BSP
Manual build
You can build things for yourself by following our Manual build howto and by choosing from the configurations available below.
U-Boot
Sunxi/Legacy U-Boot
Use the "Empire_electronix_m712" build target.
Mainline U-Boot
Use the "Empire_electronix_m712" build target.
Linux Kernel
Sunxi/Legacy Kernel
Sunxi/Legacy Kernel provides more drivers than mainline. Use the [2] file.
Mainline kernel
Not used.
Rootfs
tested succesfully: non-graphical [[3]] graphical (minimal LXDE) [4] graphical (LXDE, self built) [[5]]
Tips, Tricks, Caveats
Don't forget to have the modules loaded upon boot (not all may be built into the kernel).
FEL mode
Turn device off. Press power button and hold down; after 2-3s push additionally Vol- 4-6 times quickly
Device specific topic
...
Adding a serial port (voids warranty)
Device disassembly
Remove the screw under the SD-card slot cover. Looking at the screen carefully use your finger nails and/or a plastic tool to snap off the backcover. Start at the buttons and open the top and left side first. Then continue all the way around. Remove the backcover completely. There are screws that hold the board, but since there is nothing useful on the back of the board it is usually not necessary to remove them.
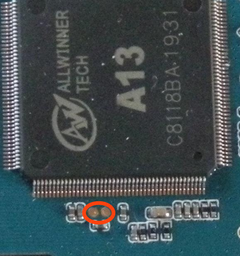
Locating the UART
UART1-Pads are next to the Pins 151 and 152 (below of the SoC). (red circle: RX left, TX right)


