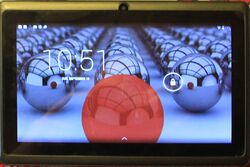
DragonTouch Y88X
| DragonTouch Y88X | |
|---|---|
 | |
| Manufacturer | TabletExpress |
| Dimensions | 188mm x 121mm x 11mm |
| Release Date | Month year |
| Website | Dragon Touch Y88X |
| Specifications | |
| SoC | A33 @ XGhz |
| DRAM | 512MiB DDR3 @ xxxMHz |
| NAND | 8GB |
| Power | DC 5V @ 3A, 3700mAh 3.7V Li-Ion battery |
| Features | |
| LCD | 1024x600 |
| Touchscreen | X-finger capacitive/resistive (Manufacturer device) |
| Video | no video export |
| Audio | 3.5mm headphone plug, internal speaker, internal microphone |
| Network | WiFi 802.11 b/g/n (Manufacturer device) |
| Storage | no external ports |
| USB | 1x USB2.0 Host (microusb port) |
| Camera | ??.?MP (????x????) front, ??.?MP (????x????) rear |
| Other | Accelerometer |
| Headers | none |
This page needs to be properly filled according to the New Device Howto and the New Device Page guide.
The Dragon Touch is a widely available low cost tablet.
This is the second model in the Dragon Touch tablet line. The previous model is the Dragon Touch Y88 and it was succeeded by the Dragon Touch Y88X Plus.
Identification
On the back of the device, the following is printed:
Dragon Touch
Y88X
The PCB has the following silkscreened on it:
LIA-BB-V6.66
1970-01-01
In android, under Settings->About Tablet, you will find:
- Model Number: Dragon Touch-Y88X
- Build Number: astar_chiphd-eng 4.4.2 KVT49L 20150128 test-keys
Sunxi support
Current status
Give a brief overview of the current status of support under sunxi here. If there is mainline support for either U-Boot or kernel, mention this too, but add the extra sections below.
Images
Add MANUFACTURER DEVICE specific sunxi ROM images here. E.g. a livesuit image or some other linux image which uses linux-sunxi code. Do not put non-sunxi images here, they should live under See also. If no sunxi based images are available, this section can be left blank.
HW-Pack
Add MANUFACTURER DEVICE HW-pack specifics here. This section can be left blank.
BSP
Add MANUFACTURER DEVICE BSP specifics here. This section can be left blank.
Manual build
- For building U-Boot, use the MANUFACTURER_DEVICE target.
- The .fex file can be found in sunxi-boards as MANUFACTURER_DEVICE.fex
Everything else is the same as the manual build howto.
Mainline U-Boot
If there is mainline U-Boot support, add this section.
For building mainline U-Boot, use the MANUFACTURER_DEVICE target.
Don't forget to add[[Category:Mainline_U-Boot]]at the bottom of the page.
Mainline kernel
If there is mainline kernel support, add this section.
Use the FAMILY-CHIP-DEVICE.dtb device-tree file for the mainline kernel.
Don't forget to add[[Category:Mainline_Kernel]]at the bottom of the page.
Tips, Tricks, Caveats
Add MANUFACTURER DEVICE specific tips, tricks, Caveats and nice to have changes here.
FEL mode
Connect your tablet to a Linux PC using the USB cable.
In order to trigger FEL mode first make sure the tablet is completely switched off. You may have to hold down the power button for ~ 10s to make sure it is really off. Then hold down the volume up button and simultaneously press the power button for ~ 5s. While still pressing the volume up button release the power button and press it again 3 times in an interval of ~ 1s. Then release both buttons.
lsusb will show a line:
Bus 001 Device 007: ID 1f3a:efe8 Onda (unverified) V972 tablet in flashing mode
sunxi-fel shows:
AWUSBFEX soc=00001667(A33) 00000001 ver=0001 44 08 scratchpad=00007e00 00000000 00000000
You may have to add
SUBSYSTEM=="usb", ATTR{idVendor}=="1f3a", MODE="0666", GROUP="plugdev"
to /etc/udev/rules/51-android.rules and restart udev in order to allow the sunxi-fel command for normal users
Device specific topic
If there are no further device specific topics to add, remove these sections.
...
Adding a serial port (voids warranty)
This section explains how to attach a serial port to the device. Make sure it refers to our UART howto. For a development board, you can just mention how to find the header with the pins and include a picture, and you can remove the warranty voiding warning.
Device disassembly
If necessary, provide a short description of how to open the device. Perhaps explain how the pins can be most easily popped. If pins do need to be popped, mention the Plastic tool howto.
Locating the UART
Describe how to find the RX,TX,GND signals here, and mention the UART howto.
Pictures
Take some pictures of your device, upload them, and add them here. DO NOT UPLOAD PICTURES WHICH YOU PLUCKED OFF THE INTERNET.
Also known as
List rebadged devices here.
See also
Add some nice to have links here. This includes related devices, and external links.
Manufacturer images
Optional. Add non-sunxi images in this section.


