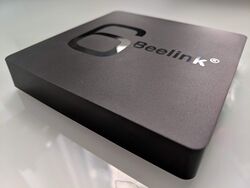
Beelink GS1
| Beelink GS1 | |
|---|---|
 | |
| Manufacturer | Shenzhen AZW Technology |
| Dimensions | 100mm x 100mm x 17mm |
| Specifications | |
| SoC | H6 @ 1.8Ghz |
| DRAM | 2GiB LPDDR3 @744 MHz, SpecTek SM512M32V01MD2LPF-107 or 3GiB LPDDR3 |
| NAND | 16GB (eMMC 5.0) Toshiba THGBMBG7D2KBAIL, or 32GB (eMMC 5.0) |
| Power | DC 5V @ 2A, |
| Features | |
| Video | HDMI (Type A - full) |
| Audio | HDMI, SPDIF, |
| Network | WiFi 802.11 b/g/n/ac (Fn-Link 6222B-PRB), 10/100/1000Mbps Ethernet (Realtek RTL8211E) |
| Storage | µSD |
| USB | 1 USB2.0 Host, 1 USB3.0 HOST |
This page needs to be properly filled according to the New Device Howto and the New Device Page guide.
If a device is special, then feel free to provide a terse description of what makes this device so special. But terse, no novels, no marketing blurb.
Identification
On the bottom of the device, the following is printed:
Model:Beelink GS1
The PCB has the following silkscreened on it:
beelink
GS1
Ver:2.0
In android, under Settings->About Tablet, you will find:
- Model Number: Beelink GS1
- Build Number: 102NO
Sunxi support
Current status
Beelink GS1 is currently supported by both mainline U-Boot and kernels.
Manual build
You can build things for yourself by following our Manual build howto and by choosing from the configurations available below.
U-Boot
Mainline U-Boot
use the beelink_gs1_defconfig (supported since v2019.07) build target.
Write u-boot-sunxi-with-spl.bin to an SD card with "dd if=u-boot-sunxi-with-spl.bin of=/dev/[SD] bs=1024 seek=8 conv=notrunc"
Linux Kernel
Sunxi/Legacy Kernel
Mainline kernel
use the sun50i-h6-beelink-gs1.dtb (kernel 5.2+). https://git.kernel.org/pub/scm/linux/kernel/git/sunxi/linux.git/commit/?h=sunxi/for-next&id=089bee8dd119ba084dee6b17a2e1a53df4f30193
Tips, Tricks, Caveats
Add MANUFACTURER DEVICE specific tips, tricks, Caveats and nice to have changes here.
FEL mode
The button on the bottom of the PCB triggers FEL mode (to be confirmed). It is reachable through a small hole in the bottom plastic cover.
Device specific topic
If there are no further device specific topics to add, remove these sections.
...
Adding a serial port (voids warranty)
The GS1 UART runs at 3.3V levels, so you need a level converter (e.g. MAX3323) to connect the board to a regular serial port. Alternatively, a USB-to-UART adapter with 3.3V levels will also work.
Device disassembly
The case is clipped together using plastic tabs on all four sides. Please see the Plastic tool howto for details of opening cases like these. The PCB is held in place by three small Philips-head screws. Make sure to remove the µSD card before taking out the PCB.
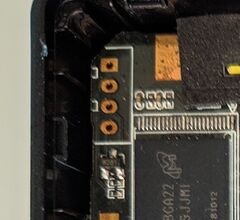
Locating the UART
The UART (3.3V levels) is available on four solder holes (2mm spacing) next to the eMMC chip slot. Soldering in a header will void the warranty.
With the square pad as pin 1 the pinout is as follows confirmed using USB-UART adapter:
- Pin 1: GND
- Pin 2: RxD
- Pin 3: TxD
- Pin 4: 3v3
Pictures
Also known as
There are currently no known rebadged devices. Update this section if you know otherwise.
See also
- Beelink_GS1 on 'wikidevi'
- AXP805 Datasheet: File:AXP805 Datasheet V1.0 en.pdf
- H6 Datasheet: File:Allwinner H6 V200 Datasheet V1.1.pdf
- H6 User Manual: File:Allwinner H6 V200 User Manual V1.1.pdf
- xda-developers Review
Manufacturer images
Optional. Add non-sunxi images in this section.


