User talk:Tkaiser
Sunxi devices lying around:
- A20-OLinuXino-Lime2
- Banana Pi
- Banana Pro
- "Banana Pi" M3
- Cubietruck
- Lamobo R1
- Orange Pi PC
- pcDuino3 Nano
First steps with Banana Pi M3
Manufacturer's OS images
- Flashing Android to eMMC
- First full boot
- Trying to boot SinoVoip's Ubuntu 15.04 image
- Trying to boot SinoVoip's Raspbian image
- Trying to boot SinoVoip's Debian 8 image
All 3 Linux images are corrupted according to "unzip -l" and since they don't provide at least MD5/SHA1 checksums it's not worth the efforts to try further
"Great", one non-functional Android image and 3 corrupted Linux images, instructions wrong as usual and according to the commit log they started just a few days ago to fix wrong hardware initialisation.
Build your own image
I'm in (using different rootfs from an Ubuntu 15.04 installation for Orange Pi PC): http://pastebin.com/xEduFFDR
One can use the corrupted Raspbian image, then mount the 2nd partition and overwrite everything from a known working rootfs (since I was already at the OPi PC, I just did a rsync -r -t -p -o -g -x --delete -l -H -D --numeric-ids -s --stats / /mnt/sda2/). Then extract lib/modules from the BSP build and then follow these instructions without step 3 and with corrected step 4 (there's no bootloader.fex -- SinoVoip did wrongly copy&paste as usual):
sudo dd if=boot0_sdcard.fex of=${card} bs=1k seek=8
sudo dd if=u-boot.fex of=${card} bs=1k seek=19096
sudo dd if=boot-resource.fex of=${card} bs=1k seek=36864
sudo dd if=env.fex of=${card} bs=1k seek=69632
sudo dd if=boot.fex of=${card} bs=1k seek=86016
Thermal issues
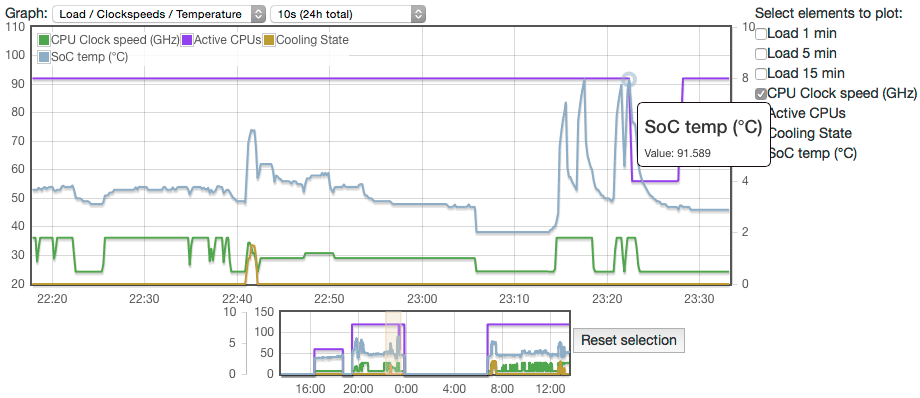
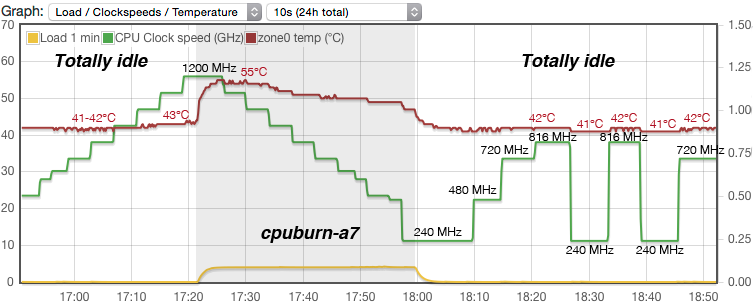
The A83T gets hot. I adjusted scaling_max_freq to the lower limit (2016000 1800000 1608000 1200000 1128000 1008000 912000 864000 720000 600000 480000), started cpuburn-a7 just to realize that only 4 cores are used and /sys/class/thermal/thermal_zone1/temp shows 58°C, at 1 GHz it's already 67°C, at 1.2GHz 77°C and more than 1.2GHz without heatsink isn't possible: CPU Budget:update CPU 0 cpufreq max to 1412000 min to 480000. A heatsink is needed, maximum performance without either a fan or tweaking thermal configuration (risk of overheating) impossible. At 1.8GHz without throttling when running on all cores, the A83T reaches an 7-zip score close to 6000 and finished sysbench --test=cpu --cpu-max-prime=20000 run --num-threads=8 in less than 53 seconds.
Preliminary RPi-Monitor template for A83T
Template here and results below
Banana Pi development history
Xunlong's Steven Zhao claiming he did ODM for Banana Pi:
- All Banana Pi revisions in one picture: http://web.archive.org/web/20151129123704/http://www.orangepi.org/orangepibbsen/data/attachment/forum/201511/29/111705ylwg31q43hw43qos.jpg
- V1.0: http://web.archive.org/web/20151129124657/http://www.orangepi.org/orangepibbsen/data/attachment/forum/201511/29/110851wg50j206xemg59w5.jpg
- V1.01: http://web.archive.org/web/20151129125842/http://www.orangepi.org/orangepibbsen/data/attachment/forum/201511/29/111233e4gebmee5if48zjs.jpg
- V1.3: http://web.archive.org/web/20151129130246/http://www.orangepi.org/orangepibbsen/data/attachment/forum/201511/29/111402vzhzr77harbub737.jpg
- V1.4: http://web.archive.org/web/20151129130359/http://www.orangepi.org/orangepibbsen/data/attachment/forum/201511/29/111541aq6nnh4tt8p79ctn.jpg
GPS data and timestamps in EXIF metadata seems to be correct and point to Xunlong's office :)
Orange Pi H3 stability/heat issues
The problem with all available OS images for current H3 devices (Orange Pi) is insane overvolting/overclocking, just 2 dvfs trable entries and most users being uneducated enough to rely on performance governor in this situation (even when idle more than 10°C more than necessary). An attempt to clarify overvolting/overclocking history can be found here
Dvfs settings that worked for me (undervolted and not recommended for general useage). Tested with cpuburn-a7, sysbench and cpufreq-ljt-stress-test running in parallel (temperatures just slightly exceeding 60°C under full load):
Headless without connected USB peripherals and 4.5V DC-IN
boot_clock = 1008

[dvfs_table]
pmuic_type = 2
extremity_freq = 1296000000
max_freq = 1200000000
min_freq = 480000000
LV_count = 7
LV1_freq = 1296000000
LV1_volt = 1320
LV2_freq = 1200000000
LV2_volt = 1180
LV3_freq = 1104000000
LV3_volt = 1120
LV4_freq = 1008000000
LV4_volt = 1080
LV5_freq = 960000000
LV5_volt = 1020
LV6_freq = 816000000
LV6_volt = 960
LV7_freq = 480000000
LV7_volt = 940
With connected HDMI display and USB peripherals
boot_clock = 1008

[dvfs_table]
pmuic_type = 2
extremity_freq = 1296000000
max_freq = 1200000000
min_freq = 480000000
LV_count = 7
LV1_freq = 1296000000
LV1_volt = 1320
LV2_freq = 1200000000
LV2_volt = 1240
LV3_freq = 1104000000
LV3_volt = 1180
LV4_freq = 1008000000
LV4_volt = 1140
LV5_freq = 960000000
LV5_volt = 1080
LV6_freq = 816000000
LV6_volt = 1020
LV7_freq = 480000000
LV7_volt = 980
Script to fix broken settings (Debian/Ubuntu)
#!/bin/bash

export PATH=/usr/local/sbin:/usr/local/bin:/usr/sbin:/usr/bin:/sbin:/bin

if [ "$(id -u)" != "0" ]; then
        echo "This script must be executed as root. Exiting" >&2
        exit 1
fi

Fex2Bin="$(which fex2bin)"
if [ "X${Fex2Bin}" = "X" ]; then
        apt-get -f -q -y install sunxi-tools
fi

Path2ScriptBin="$(df | awk -F" " '/^\/dev\/mmcblk0p1/ {print $6}')"
if [ ! -f "${Path2ScriptBin}/script.bin" ]; then
        echo "Can not find script.bin. Ensure boot partition is mounted" >&2
        exit 1
fi

MyTmpFile="$(mktemp /tmp/${0##*/}.XXXXXX)"
trap "rm \"${MyTmpFile}\" ; exit 0" 0 1 2 3 15

bin2fex <"${Path2ScriptBin}/script.bin" | grep -v "^LV" | grep -v "^max_freq" | grep -v "^min_freq" | grep -v "^extremity_freq" >"${MyTmpFile}"
if [ $? -ne 0 ]; then
	echo "Could not convert script.bin to fex. Exiting" >&2
	exit 1
fi
cp -p "${Path2ScriptBin}/script.bin" "${Path2ScriptBin}/script.bin.bak"

sed -i '/\[dvfs_table\]/a \
extremity_freq = 1296000000\
max_freq = 1200000000\
min_freq = 480000000\
LV_count = 7\
LV1_freq = 1296000000\
LV1_volt = 1320\
LV2_freq = 1200000000\
LV2_volt = 1240\
LV3_freq = 1104000000\
LV3_volt = 1180\
LV4_freq = 1008000000\
LV4_volt = 1140\
LV5_freq = 960000000\
LV5_volt = 1080\
LV6_freq = 816000000\
LV6_volt = 1020\
LV7_freq = 480000000\
LV7_volt = 980' "${MyTmpFile}"

fex2bin "${MyTmpFile}" "${Path2ScriptBin}/script.bin" >/dev/null
if [ $? -ne 0 ]; then
        mv "${Path2ScriptBin}/script.bin.bak" "${Path2ScriptBin}/script.bin"
        echo "Writing script.bin went wrong. Nothing changed" >&2
        exit 1
fi

echo "Successfully repaired broken overvolting/overclocking settings. Reboot necessary for changes to take effect"
RPi-Monitor support for H3
The SoC's temperature can be read out with H3's 3.4.39 kernel using either /sys/class/thermal/thermal_zone0/temp or /sys/class/thermal/thermal_zone1/temp (identical). RPi-Monitor template and installation instructions can be found in the H3 overclocker's forum.
Dynamic Voltage Frequency Scaling
Lessons to learn from Xunlong
The H3 is a good example for this. Currently the Orange Pi's manufacturer ships OS images for their H3 based models with weird overvolted/overclocked dvfs settings: Only 2 operating points are defined:
max_freq = 1536000000
min_freq = 480000000
LV1_freq = 1536000000
LV1_volt = 1500
LV2_freq = 1200000000
LV2_volt = 1300
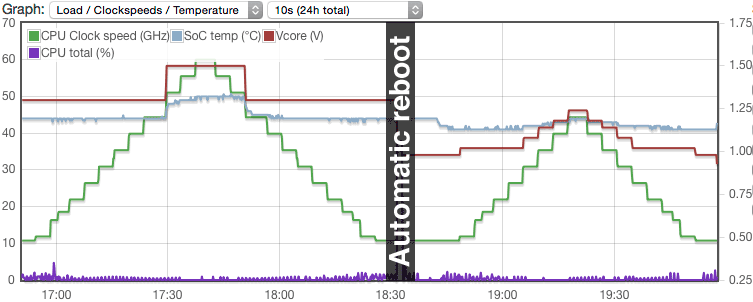
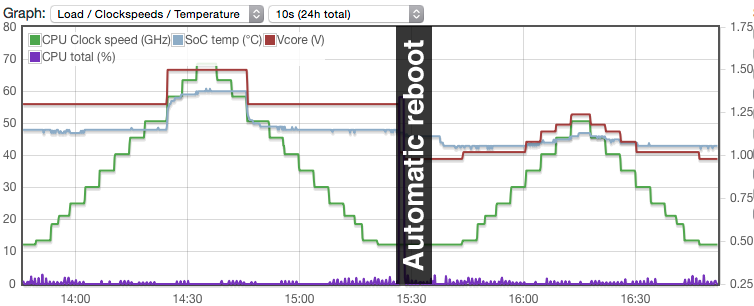
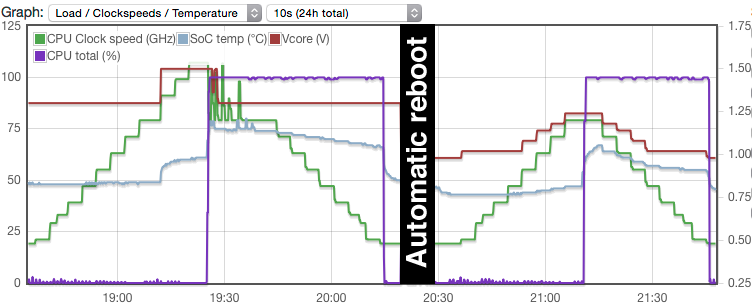
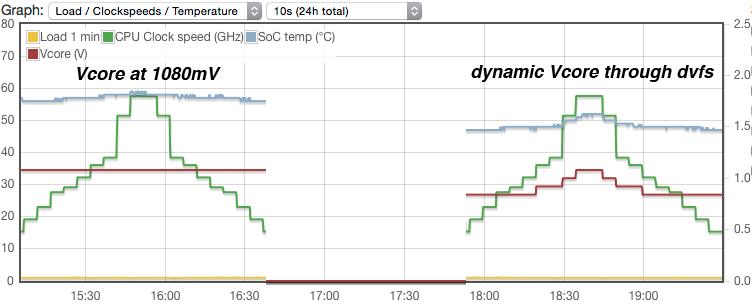
This means at 1.2GHz or below the Vcore voltage is set to 1.3V and above to 1.5V (that's necessary for Xunlong since they falsely advertise the H3 as being capable to run at "up to 1.6 GHz"). If one chooses to not overclock and to create a sane dvfs table (see my working settings above) with a few more operating points the situation changes. Now the Vcore voltage will be adjusted dynamically between 980 and 1240 mV. I let a script run through all available cpufreq settings and monitored Vcore and temperature. The connection is obvious: The more voltage the more consumption/temperature:
Tests with just a heatsink
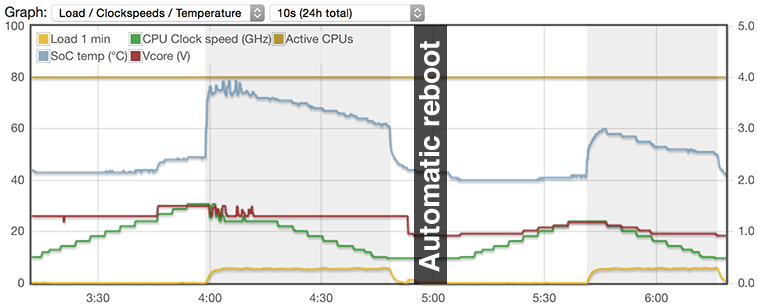
Below the same setup but with cpuburn-a7 running while decreasing the clockspeed. With Xunlong's overvolted settings the H3 when being under full load wastes more energy at 480 MHz compared to sane settings when running at 1200 MHz.
Again interesting: With Xunlongs overvolted dvfs table it's not possible to use clockspeeds above 1200 MHz under load over longer periods of time. With just a heatsink and without a fan the SoC's temperature gets always close to 80°C and then throttling occurs and lowers the maximum cpufreq while jumping between the insane 1.5V and 1.3V (that makes the difference). When using a sane dvfs table it's perfectly OK to run under full load with 1200 MHz for hours or days. Temperature doesn't exceed 60°C (ambient temperature of 23°)
Tests without a heatsink
In the meantime a 2nd OPi PC arrived so I did the tests again without heatsink. It's obvious how insane Xunlong's dvfs settings are in such situations (comparable to the situation with heatsink inside an enclosure). The temperature increases by a whopping 12°C when switching between 1.3V and 1.5V while being totally idle. And the difference between heatsink or not while idling at 1.5V is 10°C:
Again the test with cpuburn-a7: Without the heatsink and Xunlong's dvfs settings it wasn't able to operate above 1.2 GHz under full load since throttling occured and dvfs led to a voltage decrease from 1.5V to 1.3V. And the same as before with applied heatsink: when using the insane default settings then the SoC's temperature at the lowest tested cpufreq (480 MHz) is higher than compared to running with sane settings at the upper limit of 1.2 GHz:
Comparing both dvfs tables regarding consumption
The thermal values show the value with heatsink first and then without
Xunlong settings
- Idle at 480MHz/1300mV: 1.7 W consumption and 43.5°C / 48°C
- Idle at 1536MHz/1500mV: 2.1 W consumption and 50°C / 60°C
Sane settings
- Idle at 480MHz/980mV: 1.5W consumption and 40°C / 43°C
- Idle at 1200MHz/1240mV: 1.6W consumption and 43°C / 47°C
Conclusion regarding idle consumption
Based on the dvfs table's entries it can make a difference of up to 0.6W idle consumption. If you chose the performance governor and use also Xunlong's overvolted settings the H3 idles at 1.5V consuming more than 0.6W more (while doing exactly nothing) than compared to sane settings. With sane settings it makes nearly no difference which cpufreq governor is used: With both interactive or performance the SoC stays cool and consumption differs not that much. But I still prefer idling at the lowest Vcore voltage possible and instead adjusting scaling_min_freq to a reasonable upper value -- see below.
Important note regarding headless operation
With a connected display consumption is 0.3W higher and temperatures increase by 3-4°C. This also applies to the situation directly after a reboot when the display engine is active for approx. 10 minutes. Then temperature und consumption decrease when running headless (same applies to A83T and A20 -- not tested with any other SoC).
Static vs. dynamic settings with A83T
Same situation: Consumption/temperatures depend more on Vcore voltage than on actual CPU clockspeed:
Adjusting cpufreq settings based on dvfs table contents
Based on my measurements it seems like a good idea to choose the highest frequency value at the lowest Vcore voltage defined in the dvfs table for scaling_min_freq:
I ended up with the following settings being ideal for Orange Pi PC (jumping interactively between 720 and 1200 MHz and distributing USB IRQs accross all CPU cores):
echo interactive >/sys/devices/system/cpu/cpu0/cpufreq/scaling_governor
echo 720000 >/sys/devices/system/cpu/cpu0/cpufreq/scaling_min_freq
echo 1200000 >/sys/devices/system/cpu/cpu0/cpufreq/scaling_max_freq
echo 2 >/proc/irq/$(awk -F":" '/usb2/ {print $1}' </proc/interrupts)/smp_affinity
echo 4 >/proc/irq/$(awk -F":" '/usb3/ {print $1}' </proc/interrupts)/smp_affinity
echo 8 >/proc/irq/$(awk -F":" '/usb4/ {print $1}' </proc/interrupts)/smp_affinity
