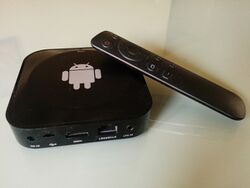
Semitime Qt840a
| Semitime Qt840a | |
|---|---|
 | |
| Manufacturer | Semitime |
| Dimensions | 100mm x 100mm x 23mm |
| Release Date | November 2013 |
| Website | Device Product Page |
| Specifications | |
| SoC | A20 @ 1Ghz |
| DRAM | 512MiB DDR3 @ 384MHz |
| NAND | 4GB |
| Power | DC 5V @ 2A |
| Features | |
| Video | HDMI (Type A - full), 3.5mm A/V connector |
| Audio | 3.5mm A/V connector, HDMI, internal microphone |
| Network | WiFi 802.11 b/g/n (Broadcom AP6330), 10/100Mbps Ethernet (ICplus IP101GA) |
| Storage | µSD |
| USB | 2 USB2.0 Host, 1 USB2.0 OTG |
| Other | Bluetooth (Broadcom AP6330), IRDA |
| Headers | UART, JTAG |
This page needs to be properly filled according to the New Device Howto and the New Device Page guide.
This HTPC uses a pretty common case design, and sometimes can be found as the Q5 or I12_TvBox or unbranded. But whereas the Q5 or I12_TvBox use a Ampak AP6210 Wifi/BT module, the QT840 uses the Ampak AP6330.
Identification
In android, under Settings->About Tablet, you will find:
- Model Number: SoftwinerEvb
- Build Number: homelet_sugar 4.2.2 JDQ39 xxxxx test-keys
Sunxi support
Current status
Supported.
Images
HW-Pack
BSP
Manual build
- For building u-boot, use the "qt840a" target.
- The .fex file can be found in sunxi-boards as qt840a.fex
Everything else is the same as the manual build howto.
Mainline kernel
Use the sun7i-a20-i12-tvbox.dts device-tree file for the mainline kernel.
Tips, Tricks, Caveats
FEL mode
The push button on the rearside of the board triggers FEL mode.
JTAG
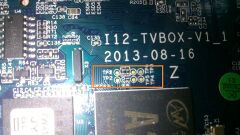
There are some JTAG pads right next to the UART pads. Here is the pin-out:
- TP3: JTAG-MS
- TP4: JTAG-CK
- TP5: JTAG-DO
- TP6: JTAG-DI
Adding a serial port (voids warranty)
Device disassembly
Only clips attach the top of the case to the rest of it. Insert your plastic tool along the top edge, and gently push the outside rim outwards, the clips should soon release.
Locating the UART
There are some clearly visible test pads next to the SoC. All you need to do is attach some wires according to our UART howto.
Pin-out:
- TP1: UART0-TX
- TP2: UART0-RX
Pictures
Take some pictures of your device, upload them, and add them here.


