Rubix A10
| Rubix A10 | |
|---|---|
 | |
| Manufacturer | Rubix |
| Dimensions | 70mm x 73mm x 25mm |
| Release Date | 2013 |
| Website | (defunct) |
| Specifications | |
| SoC | Allwinner A10 @ 1.0Ghz |
| DRAM | 1GiB DDR3L @ xxxMHz |
| NAND | 4GiB, 64 bits |
| Power | DC 5V @ 2A mini-USB; DC 12V @ 1.5A adapter |
| Features | |
| Touchscreen | N/A |
| Video | HDMI (Type A) |
| Audio | 3.5mm headphone plug, HDMI |
| Network | 150MBit @ 40MHz WiFi 802.11bgn, Bluetooth 2.1/3/4/BLE (Realtek RTL8723AS Wifi+BT Combo Module) |
| Storage | µSDXC, SATA controller |
| USB | 2x USB2.0 host ports, 1x mini USB2.0 |
| Headers | 26 pin Pi-compatible header, Arduino-compatible pass-though headers top and bottom |
This page needs to be properly filled according to the New Device Howto and the New Device Page guide.
The Rubix A10 can be used standalone as a Linux-powered SoC single board computer, and/or as a stackable "Arduino PC shield" (little Linux PC attached atop Arduino; develop code in IDE and upload to the attached Arduino.)
Identification
The black printed circuit board reads on top side, upper right corner:
RUBIX-A10 [REV 1.1]
The lower left corner near the DC 12V connector reads:
RUB-A1001 Copyright 2013
On the back of the board near the center, the following is printed like a stylized logo as on the original packaging:
Rubix A-10
and beneath that logo it reads:
www.SmartRubix.com
The PCB has the following miscellaneous info silk-screened on the back of it:
RCY-2 E10444
132 : 94v-0it
Sunxi support
Current status
Device shipped with Linaro Linux Desktop installed to the NAND FlashROM; kernel 3.4.x.sun4i+. It seems to be a blend of Linaro and Lubuntu 12.04. First boot hung and corrupted the NAND; subsequently booted it successfully using the same image but from microSD. Hardware support seems to be fairly complete, using supplied legacy kernel, though much more poking and testing to do. A search of Mainline Linux kernel did not reveal any .DTB or KConfigs or any mention of Rubix A10 though there are numerous other boards with this chipset in Mainline, with varying levels of hardware/device support.
Images
As of this writing, these Dropbox links still work, and from these, you can download the original Uboot (.img), the bootloader (.img), the entire filesystem (.tar.gz) or the entire OS bootable image (.img.gz) ready to dd onto a micro SD card and boot.
mmcbootloader.img - Bootloader image
mmcrubix.tar.gz - Rubix filesystem
mmcrubix_full.img.gz - Bootable image
HW-Pack
Optional. Add MANUFACTURER DEVICE sunxi HW-pack specifics here. When empty, this section can be removed.
BSP
Optional. Add MANUFACTURER DEVICE sunxi BSP specifics here. When empty, this section can be removed.
Manual build
You can build things for yourself by following our Manual build howto and by choosing from the configurations available below.
U-Boot
Sunxi/Legacy U-Boot
Use the MANUFACTURER_DEVICE build target.
Mainline U-Boot
Use the MANUFACTURER_DEVICE build target.
Linux Kernel
Sunxi/Legacy Kernel
Use the MANUFACTURER_DEVICE.fex file.
Mainline kernel
Use the FAMILY-CHIP-DEVICE.dtb device-tree binary.
Tips, Tricks, Caveats
Add MANUFACTURER DEVICE specific tips, tricks, Caveats and nice to have changes here.
Caveat #1: This device seems quite uncommon; searching internet for days reveals a very thin assortment of threads on Arduino forums (literally about two threads), there's no community like with Pi or Arduino, barely a mention of this board anywhere except a few places including online stores which still apparently have some Rubix in stock, for sale at wildly varying prices.
Caveat #2: Nothing is included in the box: no paper instructions, no SD card, no power cord or adapter, etc; nothing in there but the Rubix board, with the OS on its NAND flash ROM. And as of this writing, the SmartRubix website is defunct, so today it would be probably quite impossible to get official help or customer support. On the bright side, I will be adding here some helpful instructions (mainly Linux shell commands & procedures) from Rubix, which I have found on the internet, regarding repairing or installing the original OS to NAND or SDcard, details about the partitioning scheme, and how to rebuild or customize the original OS.
FEL mode
The something button probably triggers FEL mode.
Device specific topic
If there are no further device specific topics to add, remove these sections.
...

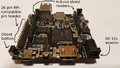
Locating the UART
The RX, TX, GND pins are within the 26-pin Pi-type header near the top of the board (see image to the right). See the [UART howto] for info about connecting to a UART using a serial terminal.
Pictures
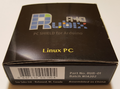
Original package
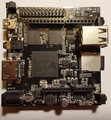
Board top
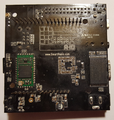
Board underside
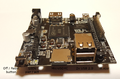
Various I/O #1
Various I/O #2


Default Desktop photo shows Openbox and LXpanel at first login after setting some font sizes. Rubix HDMI-out is connected to a 1680x1050 (native) LCD monitor's DVI input, using an HDMI-to-DVI adapter. Display detected & working nicely at correct resolution upon first boot; no configuring required.
Also known as
List rebadged devices here.
See also
Add some nice to have links here. This includes related devices, and external links.
Manufacturer images
Optional. Add non-sunxi images in this section.