Inet D70 A33
| Inet D70 A33 | |
|---|---|
 | |
| Manufacturer | iNet Tek |
| Dimensions | 190mm x 115mm x 9.7mm |
| Specifications | |
| SoC | A33 |
| DRAM | 512MiB DDR3 |
| NAND | 8GB |
| Power | DC 5V @ 3A, 2300mAh 3.7V Li-Ion battery |
| Features | |
| LCD | 1024x600 (7" 16:9) |
| Touchscreen | Multi-finger capacitive (Silead GSL1686) |
| Audio | 3.5mm headphone plug, internal speaker, internal microphone |
| Network | WiFi 802.11 b/g/n (Realtek RTL8188ETV) |
| Storage | µSD |
| USB | USB2.0 OTG |
| Camera | 0.3MP (640x480) front, 0.3MP (640x480) rear |
| Headers | UART |
Identification
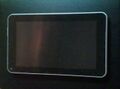
Case:
STYLUS
iDROID

ETAB B7041 * 8GB * USB 5V - 2.0A [Ring: -, Tip: +]
Made in China
PCB:
INET-D70-REV06
Zeng-gc 2014-12-12
Android -> Settings -> About Tablet:
Model Number: ETAB B7041
Build Number: RS24082015C
D70B-REV01
There is another similar version which has the following details but the board could not be booted. It has 2 Kingston D2516EC4BXGGB DRAMs instead of single and FORESEE 8GB NCEMASD9-08G eMMC instead of SKhynix H27UCG8T2ETR-BC NAND Flash.
PCB:
On front and back
INET-D70B-REV01
Zeng-gc 2014-08-22
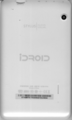
Back
iU70B-BTC-V01 单8G 1/2
PCBA:310U70BAC1BB06
510120160524007 屏:亿星BOE
RF 20160526
Manual build
You can build things for yourself by following our Manual build howto and by choosing from the configurations available below.
U-Boot
Mainline U-Boot
The q8_a33_tablet_1024x600_defconfig build target seems to produce a working U-Boot image.
Linux Kernel
Mainline kernel
Use the FAMILY-CHIP-DEVICE.dtb device-tree binary.
Tips, Tricks, Caveats
Add MANUFACTURER DEVICE specific tips, tricks, Caveats and nice to have changes here.
FEL mode
To enter FEL mode:
- Switch off the device.
- Hold down the Vol- and Power buttons.
- Release the Power button once u-boot reports: key pressed value=0xb.
- Press the Power three times, u-boot should report: you can unclench the key to update now.
- Release the Vol- button.
It is possible to query the device version at this stage, but reading results in failure.
Device specific topic
If there are no further device specific topics to add, remove these sections.
Adding a serial port (voids warranty)

Device disassembly
- Remove the two screws surrounding the button panel interface.
- Insert a suitable plastic tool into the seam of the casing next to one of the screw holes.
- Gently slide the tool towards and around the nearest corner.
- If the first clip has not been released at this point, twist the tool slowly to pry the casing halves apart.
- Place the tool on the opposite end of the released clip and proceed by sliding the tool towards the next clip.
- Continue carefully around the perimeter of the casing until all clips have been released.
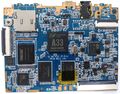
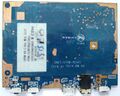
Locating the UART
UART TX and RX can be found between the µSD connector, NAND Flash IC, and Touchscreen FPC connector. See the UART howto for further information.
Pictures
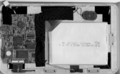
D70B-REV01: Front
D70B-REV01: Back


Also known as
- Robuste ES711. (Algeria).-- Stock ROM: http://www.robuste.dz/es711/
- Bitmore Colortab7. (Greece).-- Working ROM: http://www.robuste.dz/es711/
- Digma Optima 7.11 TT7041AW (Russia). --The above ROM is working fine.